Azure Private Endpoints, DNS Private Resolver, and Conditional Forwarders: Private Access End-to-End

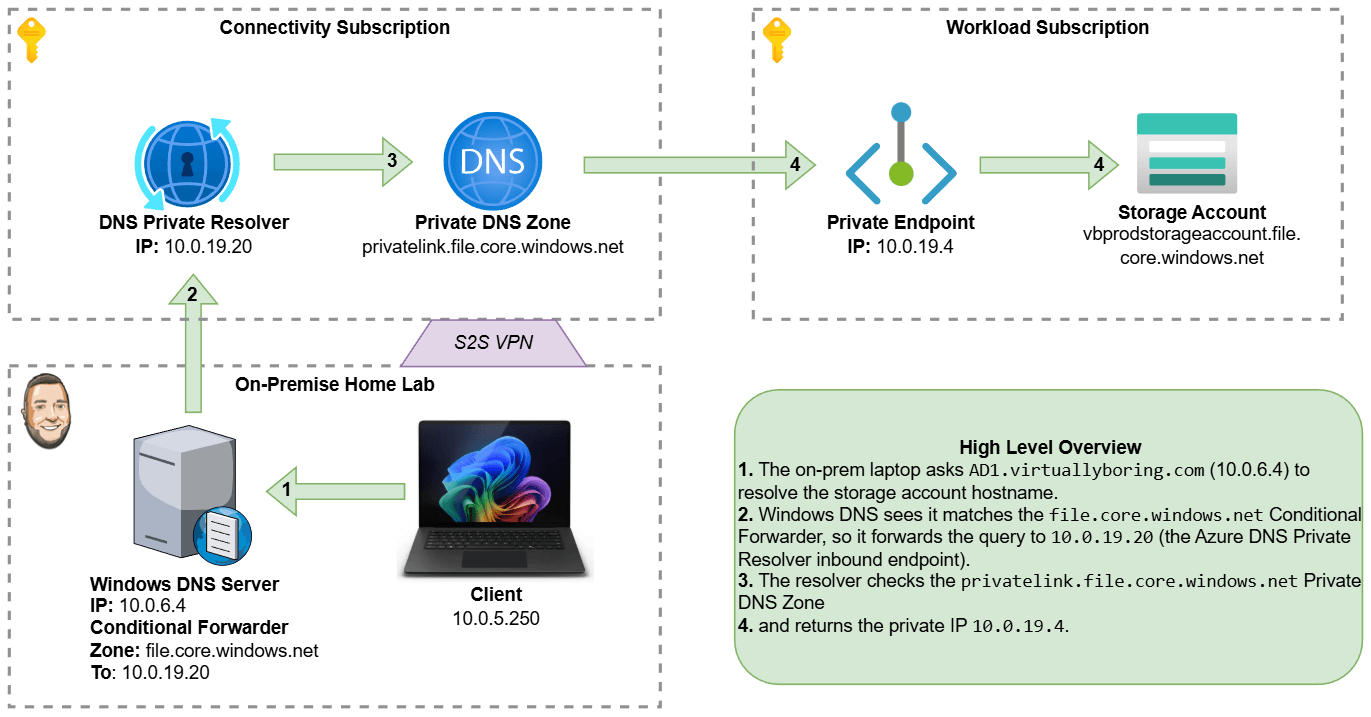
Diagram of Azure DNS with Private Resolver, Private DNS Zone, and Conditional Forwarder

By default, most Azure services — storage accounts, key vaults, SQL databases, you name it — are reachable over the public internet. That’s fine for a quick lab, but not great when you want your on-premises workloads to talk to Azure resources without any of that traffic ever leaving your private network. Prerequisite: This walkthrough assumes you already have a VPN tunnel between your on-premises network and your Azure VNet. If you haven’t set that up yet, check out my guide on Deploying an Azure Virtual Network Gateway first. That’s where Private Endpoints come in. A Private Endpoint drops a Network Interface Card (NIC) directly inside your Virtual Network, giving your Azure resource a private IP address that’s only reachable from within your network. No public internet required. The catch? DNS. Your on-premises DNS servers still resolve that storage account’s hostname to its old public IP. We need to teach them to ask Azure’s private DNS instead. To bridge that gap we’ll use Azure’s DNS Private Resolver — a fully managed, serverless DNS forwarder that lives inside your VNet — and then configure a Conditional Forwarder on your Windows DNS server to point traffic for Azure domains at it. Here’s what we’re building end-to-end: Create a Private Endpoint for an Azure Storage Account (file share). Create a DNS Private Resolver with an inbound endpoint so on-prem DNS can reach it. Configure a Conditional …

Read more…

Migrate GoDaddy Domain and DNS to AWS Route 53

I started this blog back in June of 2014 to play around with platforms like Joomla and WordPress. I wouldn’t be truthful if I didn’t say the GoDaddy Superbowl commercials didn’t sell me to start with GoDaddy to register my domain name and provide hosting. Over the years I haven’t had any major issues that caused long term outages, only a few hours sprinkled in every month with their Linux Hosting Essential with CPanel plan. With 2020 being my first year working in AWS I felt strongly to move my domain over to AWS Route 53 so I can start playing around with the AWS suite of services! That is the goal of this post is to walk through the transfer my domain and DNS from GoDaddy to AWS Route 53!

These instructions are specifically for GoDaddy but would work for any domain registrar provider you are using today. The screenshots would be different but the task would be the same. You have to switch back and forth between GoDaddy console and AWS Console quite a bit. I try to start the task stating if a console swap is need and where you should be. Working with DNS can be tricky as it can be a waiting game especially when dealing with external DNS replicated across the world (Time To Live – TTL). If doing this in a production environment make sure you do this during a low peak time and give yourself extra window of time to troubleshoot (and wait for DNS replication). It’s pretty easy and straight forward, but it’s DNS.

What exactly is Route 53? Route 53 is Amazon Web Services (AWS) highly available and scalable Domain Name System (DNS) service launched back in 2010. It has powerful traffic routing policies and health checks that you use depending on your use case. Route 53 has a default limit of 50 domain names however this limit can be increased by contacting AWS support.

Table of Contents:

Part 1: Migrate from GoDaddy DNS to AWS Route 53

Part 2: Migrate domain registered with GoDaddy to AWS Route 53

Part 1 – Migrate from GoDaddy DNS to AWS Route 53:

Step 1: Create AWS Route 53 Hosted Zone

What is a AWS Hosted Zone? Here is a snippet from the Route 53 FAQ:

A hosted zone is an Amazon Route 53 concept. A hosted zone is analogous to a traditional DNS zone file; it represents a collection of records that can be managed together, belonging to a single parent domain name. All resource record sets within a hosted zone must have the hosted zone’s domain name as a suffix. For example, the amazon.com hosted zone may contain records named www.amazon.com, and www.aws.amazon.com, but not a record named www.amazon.ca. You can use the Route 53 Management Console or API to create, inspect, modify, and delete hosted zones. You can also use the Management Console or API to register new domain names and transfer existing domain names into Route 53’s management.

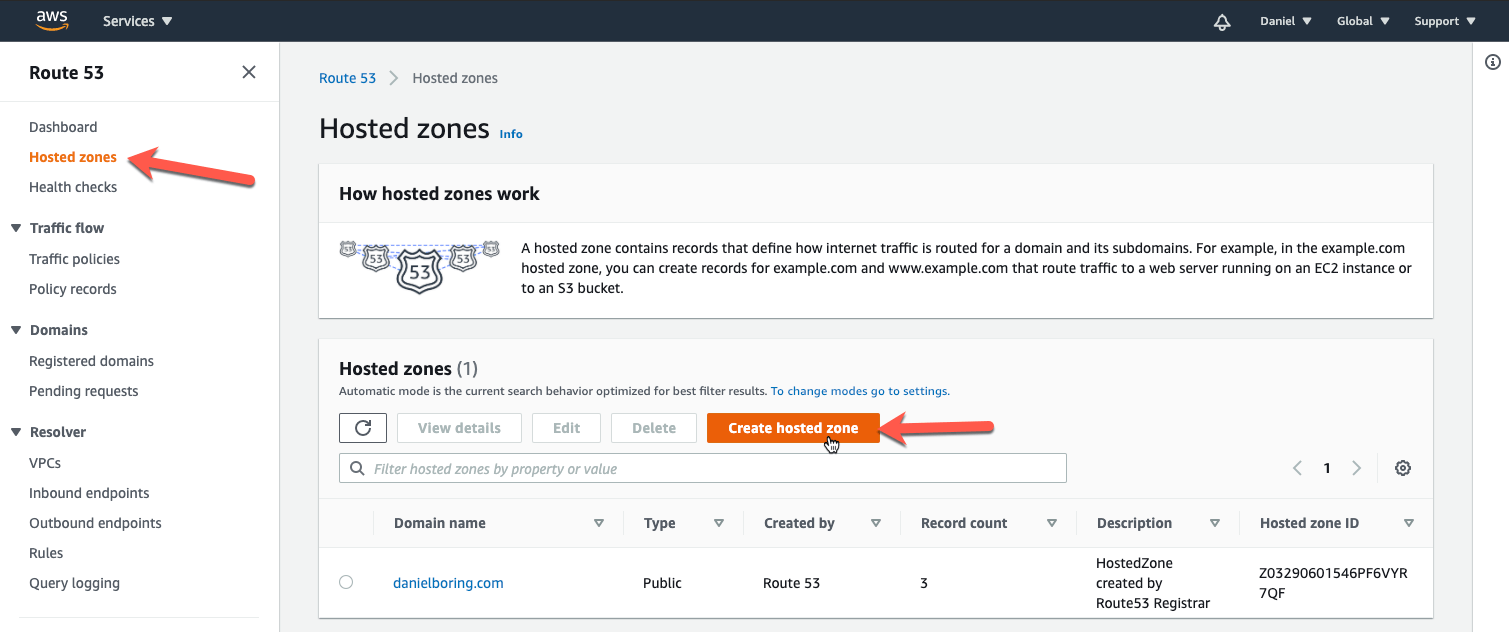
First we must create the Hosted Zone in Route 53. This is so we can get our Amazon Name Servers for use in a later step. Go to Route 53 in the AWS console, then click Hosted Zones on the left column, then Create Hosted Zone:

Read more…