Dual-Region Azure VPN Gateway: BGP Site-to-Site Guide

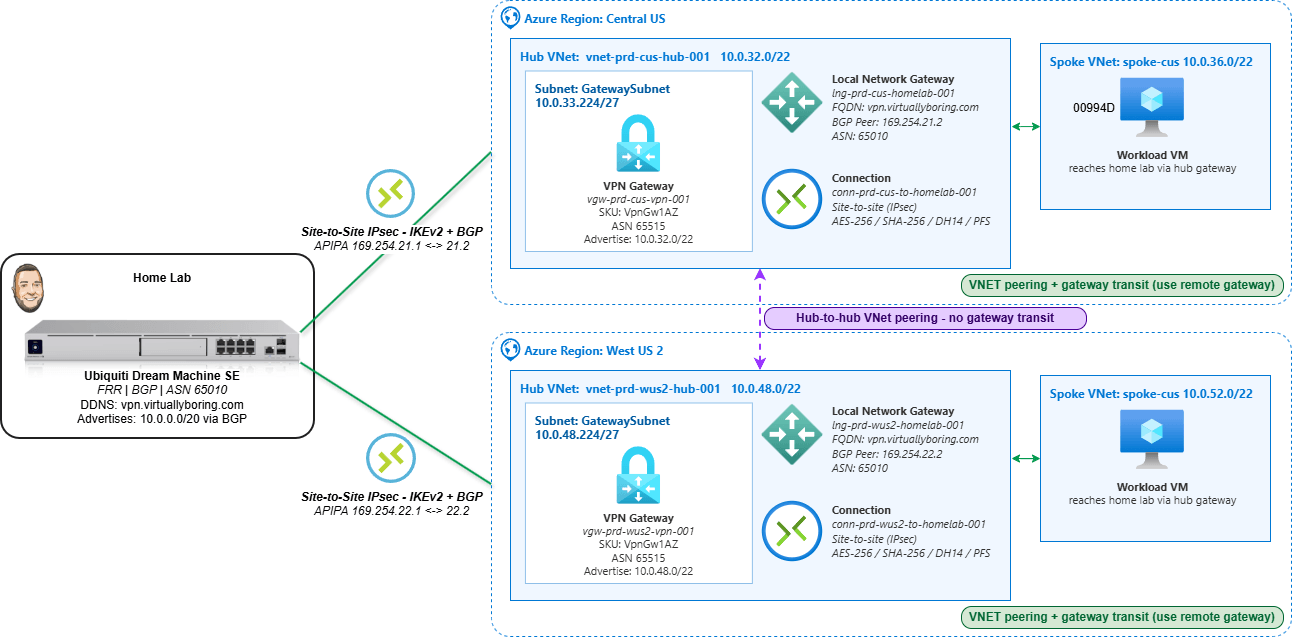
An Azure VPN Gateway is the managed service that terminates encrypted IPsec tunnels between Azure and a network outside it — in this case, a home lab. Deploy a dual-region Azure VPN Gateway — one in each of two Azure regions, pointing both back to the same on-prem device — and you get dual-region Site-to-Site connectivity: two independent encrypted paths from your hub VNets to home. New to VPN gateways? My single-region Azure VPN Gateway how-to walks through the basics first.

The reason to build it this way is resilience and routing. A single-region gateway is one tunnel and one point of failure; a gateway in Central US and West US 2 gives two regional paths. Pair that with BGP and the routing becomes self-healing — each side advertises its prefixes, and if one regional path drops, traffic converges onto the other without anyone editing a static route. That’s the difference between “a VPN that works” and “a VPN that keeps working when something breaks.”

This is a portal-first walkthrough: every gateway, Local Network Gateway, and connection built by hand so the Azure object model is actually visible. I’ll cover all the settings, plus the two spots that trip people up most — pointing both regions at one DDNS name (fine here because my home lab sits behind a single ISP, so everything resolves back to one public IP), and getting BGP to actually come up over APIPA.

Dual-Region VPN Gateway vs. Azure Virtual WAN: which enterprise design fits?

Before you build anything, it’s worth knowing this isn’t the only enterprise-approved design for hybrid connectivity — and neither is “better” in the abstract. Both the dual-region VPN Gateway hub-and-spoke and Azure Virtual WAN are documented reference architectures in Microsoft’s Cloud Adoption Framework. Both eliminate single points of failure, both scale, and both route over the Microsoft backbone. The difference is who manages the hub and how far you need to scale.

What each one actually is:

  • Dual-region VPN Gateway (what this post builds): A self-managed hub-and-spoke. You own the hub VNets, the gateways, the peerings, the route tables, and the gateway-transit settings. Redundancy is built in even here — an active-standby gateway is really two instances under the hood, and the zone-redundant AZ SKUs spread those instances across availability zones. Run one per region and a single region (or a single zone) failing doesn’t take you down.
  • Azure Virtual WAN: A Microsoft-managed hub. Microsoft runs the hub router, the inter-hub mesh, and the peerings for you. Each hub runs two active VPN gateway instances by default, and connecting a spoke automatically gives it transitive any-to-any routing — no manual gateway-transit toggles, no per-VNet peering sprawl.

Here’s the practical split:

ConsiderationDual-region VPN Gateway (self-managed)Azure Virtual WAN (managed)
Hub managementYou own itMicrosoft-managed
Scale ceilingUp to 100 tunnels per gateway (SKU-dependent); 500 peerings per VNetUp to 1,000 VPN connections / 2,000 tunnels per hub, 20 Gbps aggregate, multiple hubs per region
Spoke-to-spoke / transit routingYou wire it manually (gateway transit, UDRs)Built in and automatic
Branch / SD-WAN onboardingManual per sitePartner CPE auto-provisioning at scale
Best atA handful of regions and spokes you want full control overGlobal, many-region, many-branch networks
Operational overheadHigher — every path is yours to configureLower — the hub is a service

Read more…

Entra Cloud Sync + Hybrid Join: A Step-by-Step Guide

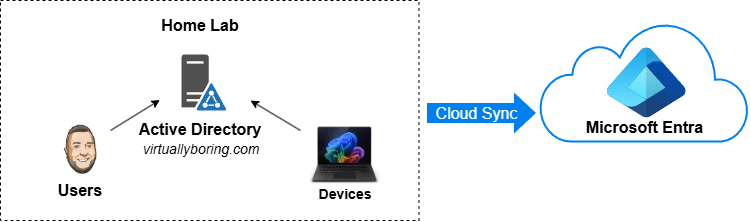
I run a little Active Directory domain in my home lab, and for the longest time it lived completely on its own island. Local logins, local DNS, local everything. Meanwhile every cloud thing I touched — Microsoft 365, Azure, random SaaS apps — wanted me to log in with a different identity. Two usernames, two passwords, two worlds. That’s the exact problem Microsoft built hybrid identity to solve, and I wanted to actually understand how it works instead of just reading about it.

So I built it. This post is the result: what Entra Connect actually is, the difference between the two sync engines Microsoft gives you, what Hybrid Join means, and a full best-practices walkthrough of deploying Entra Cloud Sync and then Hybrid Join on top of it. (There’s a twist on the Hybrid Join side for Cloud Sync setups — I’ll get to it.) I’ll link the Microsoft Learn docs at every step so you’re never taking my word for it.

If you’ve got an on-prem domain and a Microsoft tenant and you want them to feel like one thing — this is the post.

Read more…

Azure Private Endpoints, DNS Private Resolver, and Conditional Forwarders: Private Access End-to-End

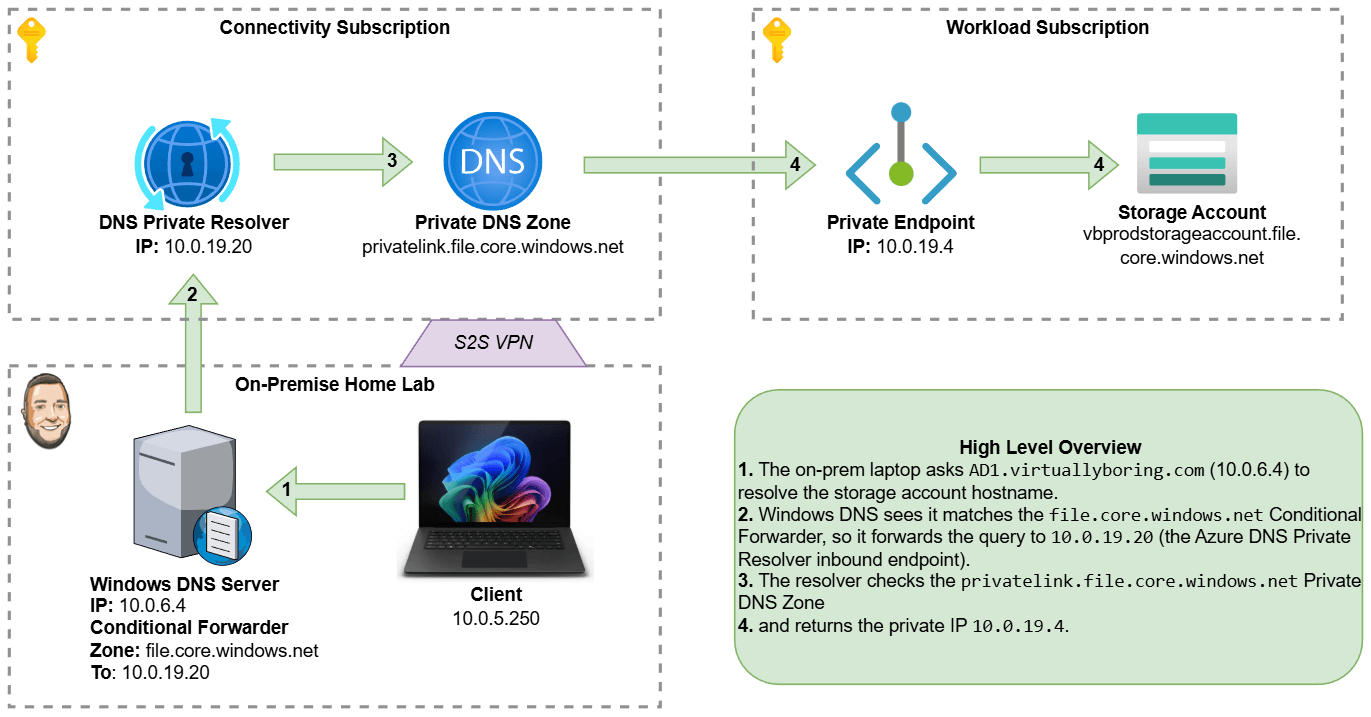
Diagram of Azure DNS with Private Resolver, Private DNS Zone, and Conditional Forwarder

By default, most Azure services — storage accounts, key vaults, SQL databases, you name it — are reachable over the public internet. That’s fine for a quick lab, but not great when you want your on-premises workloads to talk to Azure resources without any of that traffic ever leaving your private network.

That’s where Private Endpoints come in. A Private Endpoint drops a Network Interface Card (NIC) directly inside your Virtual Network, giving your Azure resource a private IP address that’s only reachable from within your network. No public internet required.

The catch? DNS. Your on-premises DNS servers still resolve that storage account’s hostname to its old public IP. We need to teach them to ask Azure’s private DNS instead. To bridge that gap we’ll use Azure’s DNS Private Resolver — a fully managed, serverless DNS forwarder that lives inside your VNet — and then configure a Conditional Forwarder on your Windows DNS server to point traffic for Azure domains at it.

Here’s what we’re building end-to-end:

  • Create a Private Endpoint for an Azure Storage Account (file share).
  • Create a DNS Private Resolver with an inbound endpoint so on-prem DNS can reach it.
  • Configure a Conditional Forwarder in Windows DNS to send *.file.core.windows.net queries to that resolver.

There are multiple scenarios for using these services. The scenario I am deploying is called Azure Private Resolver for virtual network and on-premises workloads. Check that link for additional scenario types!

Let’s jump in!

Read more…

Deploying Azure Virtual Network Gateway Basic: A How-To Guide

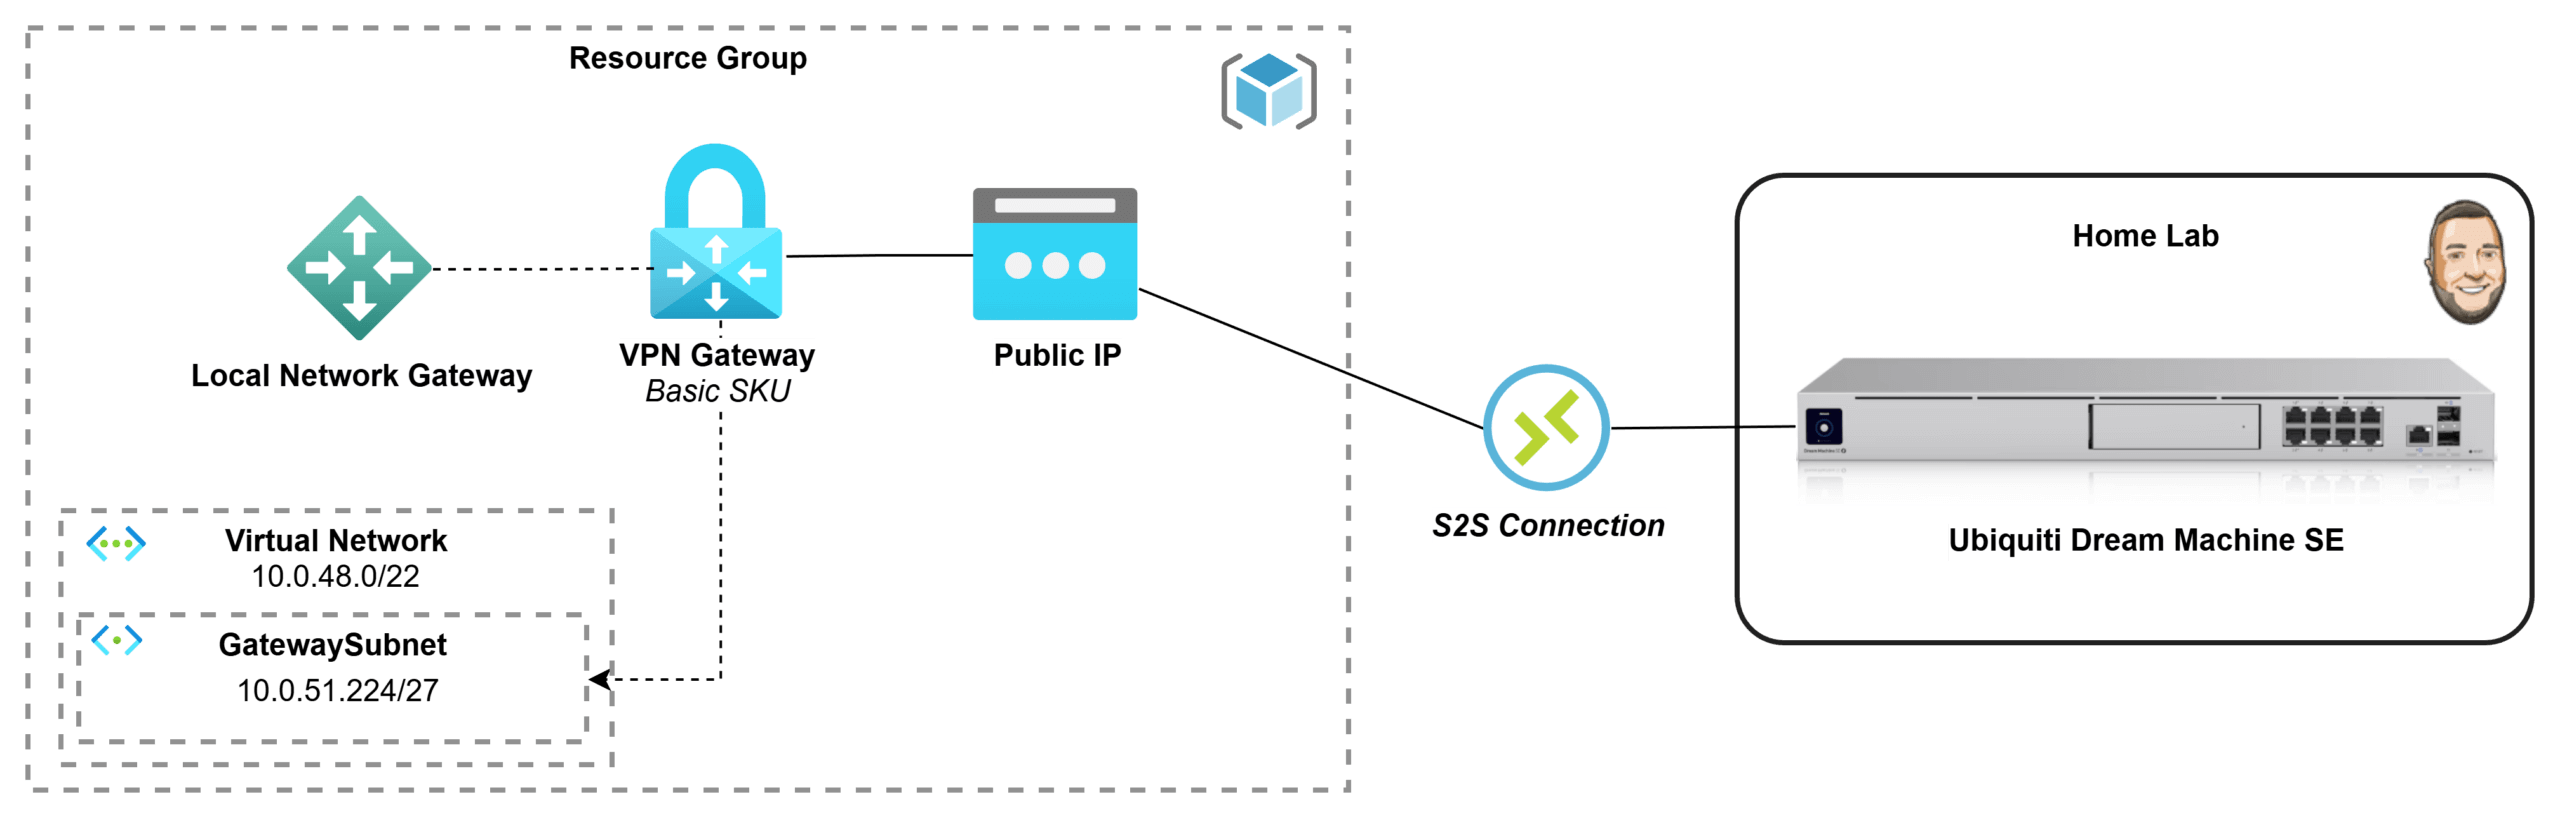
If you’ve got an Azure subscription through Visual Studio Enterprise, you’ve basically been handed the perfect playground for testing and learning in the cloud. But once you start building resources inside a private Azure network, you quickly hit the next challenge: how do you securely connect it back to your home lab without exposing everything to the internet? In this post, I’m going to go through the process of how I deployed a Basic Azure Virtual Network Gateway and connected it to my Ubiquiti Dream Machine, creating a secure site-to-site VPN tunnel between my Azure VNet and my home network. I wanted to document what that process looked like for me and share it in case it helps someone else doing the same thing.

What is a Virtual Network Gateway?

TL;DR: A managed VPN concentrator and router for your Azure VNet!

An Azure Virtual Network Gateway is used when you need secure, private connectivity into an Azure Virtual Network without exposing resources to the public internet. It acts like a managed VPN router inside your VNet, enabling encrypted connections such as site-to-site VPNs (linking your on-premises network to Azure), point-to-site VPNs (allowing individual users to securely connect to Azure), or VNet-to-VNet connections (linking multiple Azure networks). It’s most valuable for hybrid cloud scenarios, remote administration, and keeping systems reachable over private IP addresses while maintaining strong network security and controlled access. Azure supports a few common VPN connection models, each designed for a specific access pattern:

  • Site-to-Site (S2S) VPN: Creates an always-on encrypted tunnel between an on-premises network (office/data center) and an Azure VNet, making it ideal for hybrid connectivity where entire networks need to communicate over private IPs.
  • Point-to-Site (P2S) VPN: Connects individual users/devices directly into an Azure VNet, which is perfect for remote admin access, developer labs, or secure access to private Azure resources without exposing them publicly.
  • VNet-to-VNet: Connects two Azure VNets using VPN tunnels, typically used when networks must remain isolated (different environments/regions/subscriptions) but still require secure private communication—though VNet peering is often simpler for Azure-to-Azure connectivity.

Read more…

How to Takeover an Unmanaged Directory in Azure

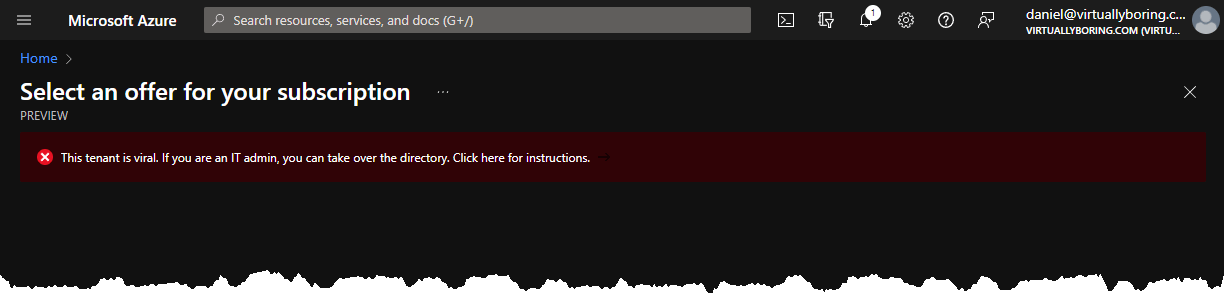
When trying to create an Azure subscription I received the following error:

This tenant is viral. If you are an IT admin, you can take over the directory.

After some reading a viral tenant is another meaning for an unmanaged directory. An unmanaged directory is a directory that was automatically created when a user with @virtuallyboring.com created an Azure account. Its a directory that has no global administrator. Microsoft created a Azure Active Directory (AAD) tenant in the background and is sitting there unmanaged. This is so users can create an account and use resources without it being a blocker that the domain isn’t claimed in AAD.

There are two ways to take over an unmanaged directory:

  • Internal admin takeover:
    • Your account gets elevated to global administrator
    • No users, domains, or service plans are migrated
  • External Admin Takeover:
    • Add the unmanaged domain name to a tenant where you are a Global Administrator
    • A mapping of users to resources is created in your managed Azure Active Directory
      • Users can continue to access services without interruption

Source: Admin takeover of an unmanaged directory – Azure AD | Microsoft Docs

For my example I will be using a internal admin takeover.

Read more…

Migrate GoDaddy Domain and DNS to AWS Route 53

I started this blog back in June of 2014 to play around with platforms like Joomla and WordPress. I wouldn’t be truthful if I didn’t say the GoDaddy Superbowl commercials didn’t sell me to start with GoDaddy to register my domain name and provide hosting. Over the years I haven’t had any major issues that caused long term outages, only a few hours sprinkled in every month with their Linux Hosting Essential with CPanel plan. With 2020 being my first year working in AWS I felt strongly to move my domain over to AWS Route 53 so I can start playing around with the AWS suite of services! That is the goal of this post is to walk through the transfer my domain and DNS from GoDaddy to AWS Route 53!

These instructions are specifically for GoDaddy but would work for any domain registrar provider you are using today. The screenshots would be different but the task would be the same. You have to switch back and forth between GoDaddy console and AWS Console quite a bit. I try to start the task stating if a console swap is need and where you should be. Working with DNS can be tricky as it can be a waiting game especially when dealing with external DNS replicated across the world (Time To Live – TTL). If doing this in a production environment make sure you do this during a low peak time and give yourself extra window of time to troubleshoot (and wait for DNS replication). It’s pretty easy and straight forward, but it’s DNS.

What exactly is Route 53? Route 53 is Amazon Web Services (AWS) highly available and scalable Domain Name System (DNS) service launched back in 2010. It has powerful traffic routing policies and health checks that you use depending on your use case. Route 53 has a default limit of 50 domain names however this limit can be increased by contacting AWS support.

Table of Contents:

Part 1: Migrate from GoDaddy DNS to AWS Route 53

Part 2: Migrate domain registered with GoDaddy to AWS Route 53

Part 1 – Migrate from GoDaddy DNS to AWS Route 53:

Step 1: Create AWS Route 53 Hosted Zone

What is a AWS Hosted Zone? Here is a snippet from the Route 53 FAQ:

A hosted zone is an Amazon Route 53 concept. A hosted zone is analogous to a traditional DNS zone file; it represents a collection of records that can be managed together, belonging to a single parent domain name. All resource record sets within a hosted zone must have the hosted zone’s domain name as a suffix. For example, the amazon.com hosted zone may contain records named www.amazon.com, and www.aws.amazon.com, but not a record named www.amazon.ca. You can use the Route 53 Management Console or API to create, inspect, modify, and delete hosted zones. You can also use the Management Console or API to register new domain names and transfer existing domain names into Route 53’s management.

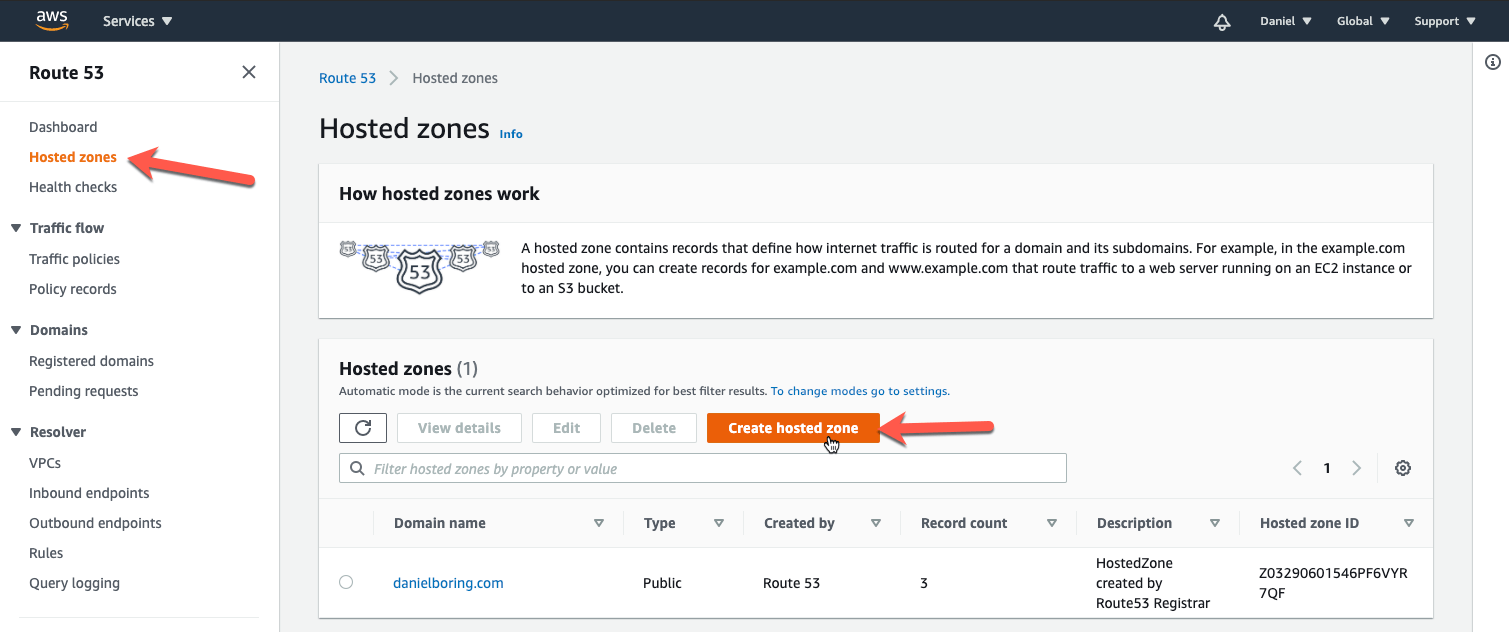
First we must create the Hosted Zone in Route 53. This is so we can get our Amazon Name Servers for use in a later step. Go to Route 53 in the AWS console, then click Hosted Zones on the left column, then Create Hosted Zone:

Read more…