
If you’ve got an Azure subscription through Visual Studio Enterprise, you’ve basically been handed the perfect playground for testing and learning in the cloud. But once you start building resources inside a private Azure network, you quickly hit the next challenge: how do you securely connect it back to your home lab without exposing everything to the internet? In this post, I’m going to go through the process of how I deployed a Basic Azure Virtual Network Gateway and connected it to my Ubiquiti Dream Machine, creating a secure site-to-site VPN tunnel between my Azure VNet and my home network. I wanted to document what that process looked like for me and share it in case it helps someone else doing the same thing.
What is a Virtual Network Gateway?
TL;DR: A managed VPN concentrator and router for your Azure VNet!
An Azure Virtual Network Gateway is used when you need secure, private connectivity into an Azure Virtual Network without exposing resources to the public internet. It acts like a managed VPN router inside your VNet, enabling encrypted connections such as site-to-site VPNs (linking your on-premises network to Azure), point-to-site VPNs (allowing individual users to securely connect to Azure), or VNet-to-VNet connections (linking multiple Azure networks). It’s most valuable for hybrid cloud scenarios, remote administration, and keeping systems reachable over private IP addresses while maintaining strong network security and controlled access. Azure supports a few common VPN connection models, each designed for a specific access pattern:
- Site-to-Site (S2S) VPN: Creates an always-on encrypted tunnel between an on-premises network (office/data center) and an Azure VNet, making it ideal for hybrid connectivity where entire networks need to communicate over private IPs.
- Point-to-Site (P2S) VPN: Connects individual users/devices directly into an Azure VNet, which is perfect for remote admin access, developer labs, or secure access to private Azure resources without exposing them publicly.
- VNet-to-VNet: Connects two Azure VNets using VPN tunnels, typically used when networks must remain isolated (different environments/regions/subscriptions) but still require secure private communication—though VNet peering is often simpler for Azure-to-Azure connectivity.
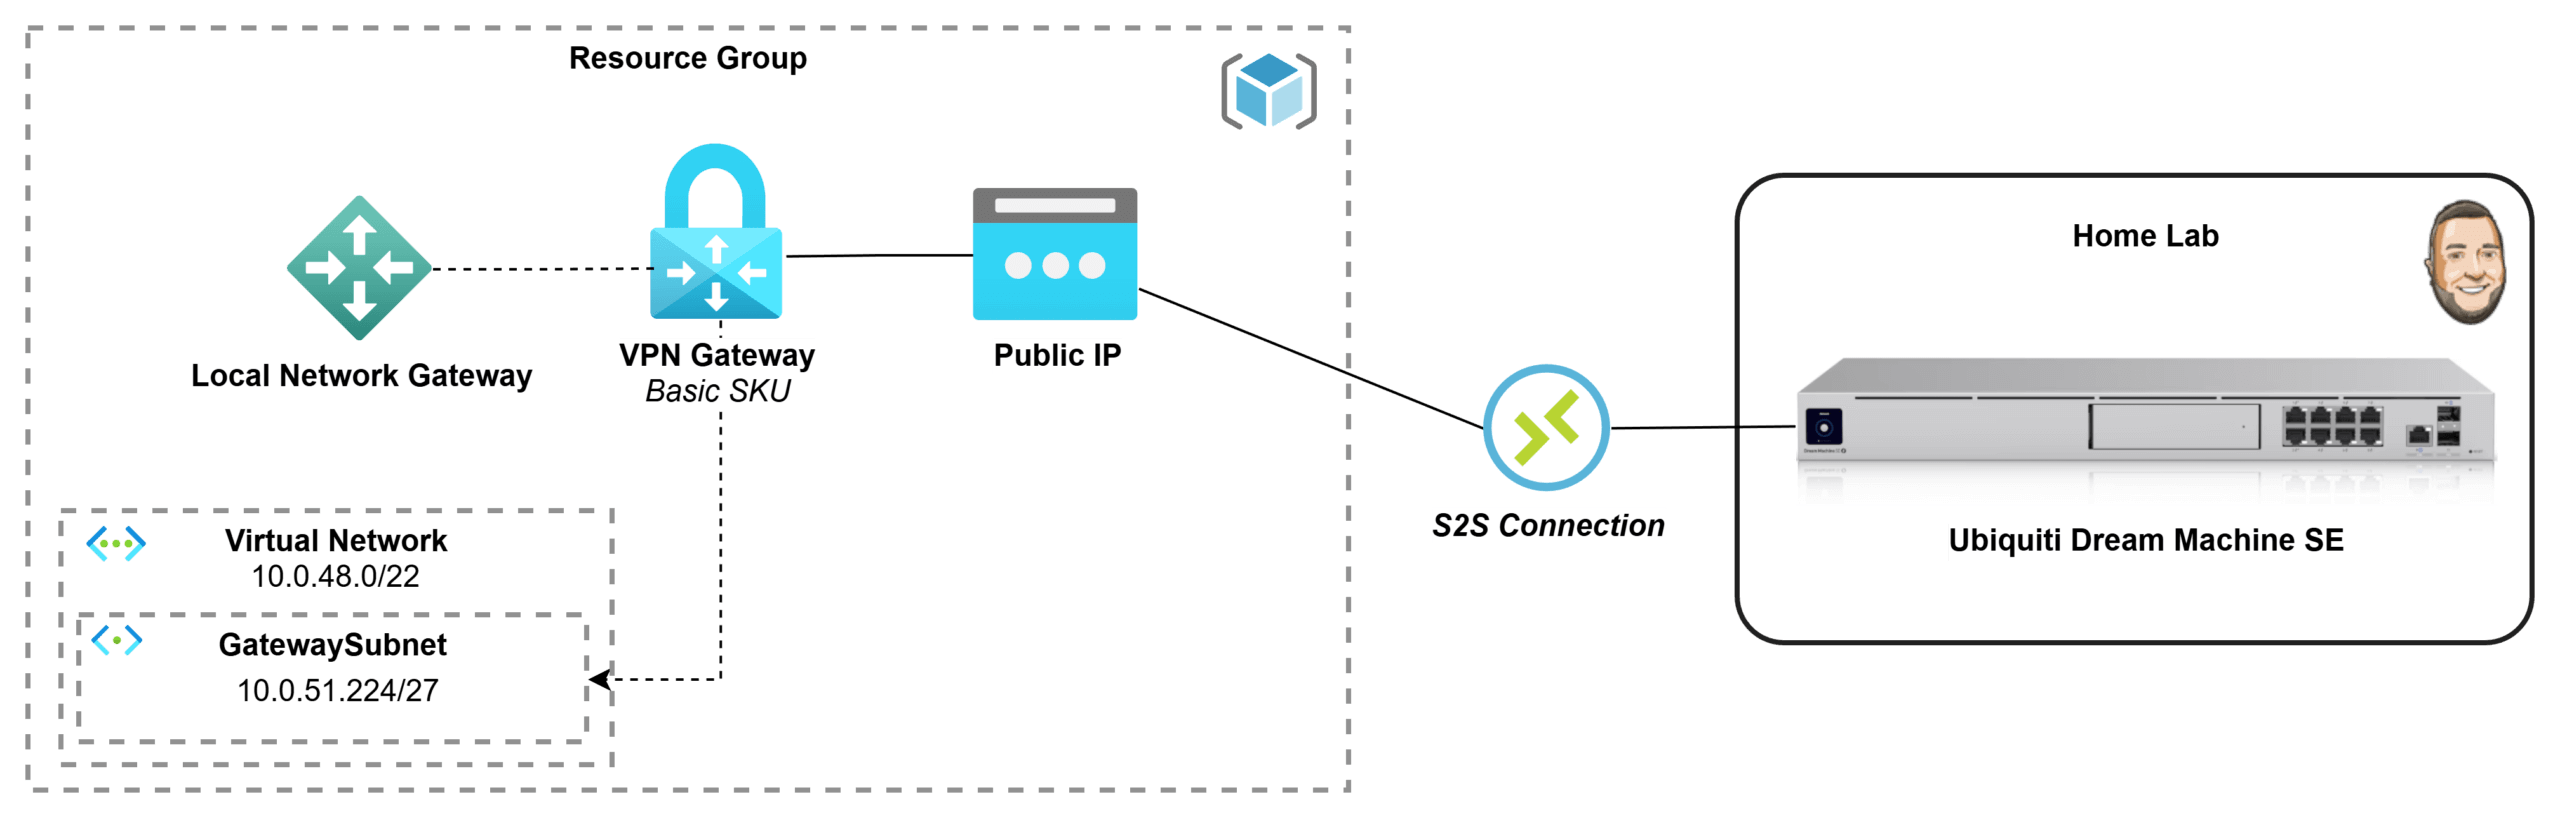
When you deploy an Azure Virtual Network Gateway, you’re not just “turning on VPN” — you’re standing up a managed routing + VPN appliance cluster inside your VNet that Azure runs for you. The components you will deploy and configure are:
- VPN Gateway: The managed VPN concentrator/router
- Public IP: The Azure VPN endpoint your device connects to
- Local Network Gateway: Represents your on-prem/home network and public IP. Think of it like the address in an address book.
- GatewaySubnet: Dedicated subnet within your virtual network reserved only for gateway infrastructure. Microsoft recommends /27 or larger, for the basic SKU it can actually be a /29.
- Connection: Binds the two gateways together using the shared key and tunnel settings.
Virtual Network Gateway SKUs
Also worth calling out: VPN Gateways come in multiple SKUs, and the SKU you choose directly impacts cost, throughput, tunnel limits, and which features you can use. The Basic SKU is essentially the “starter tier” and is best suited for test/dev scenarios—exactly what I’m building here—because it keeps spend predictable and helps me stay within my $150/month Visual Studio Azure credit. That tradeoff is real though: Basic is capped at roughly 100 Mbps of aggregate throughput and supports a smaller feature set compared to the newer VpnGw* SKUs (which unlock higher performance, more tunnels, better redundancy options, and more advanced capabilities).
For my home lab use case, Basic is “good enough”—I’m focused on learning and validating connectivity rather than pushing production-grade traffic. But depending on what you’re trying to do (multiple sites, higher throughput, more resiliency, or newer protocol/auth options), you’ll want to choose a SKU that supports the requirements of your setup.

Deploying the Virtual Network Gateway
The Basic SKU cannot be deployed via the Azure Portal anymore; it can only be deployed via PowerShell or Azure CLI. I decided to put it all together into a PowerShell script for my deployment and can be found here on Github.
Prerequisites and Planning
Your environment setup:
- Latest version of PowerShell
- Latest version of Azure PowerShell
- IDE: Visual Studio Code (Windows Terminal, etc)
Before you can use run the PowerShell script, there are a few things you need to think though! These resources do not need to be deployed but you should have them defined to enter into the PowerShell script in the next step:
- Tenant ID: You will need your tenant ID
- Subscription: Which subscription should the VNET Gateway be deployed in? Following the recommended approach of the Azure Landing Zone framework, the VNET Gateway would fall under the Connectivity subscription. Grab the subscription id.
- Resource Group: Follow your naming standard
- Region Location: Which region do you want to use? Go here and grab the programmatic name from the list
- Virtual Network & Prefix: Can create new or use existing
- GatewaySubnet Prefix: The virtual network needs a subnet named GatewaySubnet with an prefix of /27. Technically the Basic SKU can be deployed with a /29 but starting with /27 gives elbow room just incase it the SKU needs to be upgraded or redeployed.
Additional deployment information can be found here: Create a Basic SKU VPN gateway using PowerShell
For my deployment, I am starting with zero resources deployed and will let the script deploy it all for me.

Virtual Network Gateway Deployment
Download and open the PowerShell script with your IDE. At the top is a parameters section, fill that out as applicable, and run it!
Download PowerShell Deployment Script: https://github.com/DanielBoring/Templates/blob/6eb7e07a44b23c14662573e3f5a07656f7e9e0ef/Azure/VNET%20Gateway%20-%20Basic/azure-vnet-gateway-basic.ps1

The output should look like the below. If you get errors, work through those and rerun.

☕ Note: On the gateway deployment step, it can take ~20 minutes to deploy. Just let it run and grab some coffee!
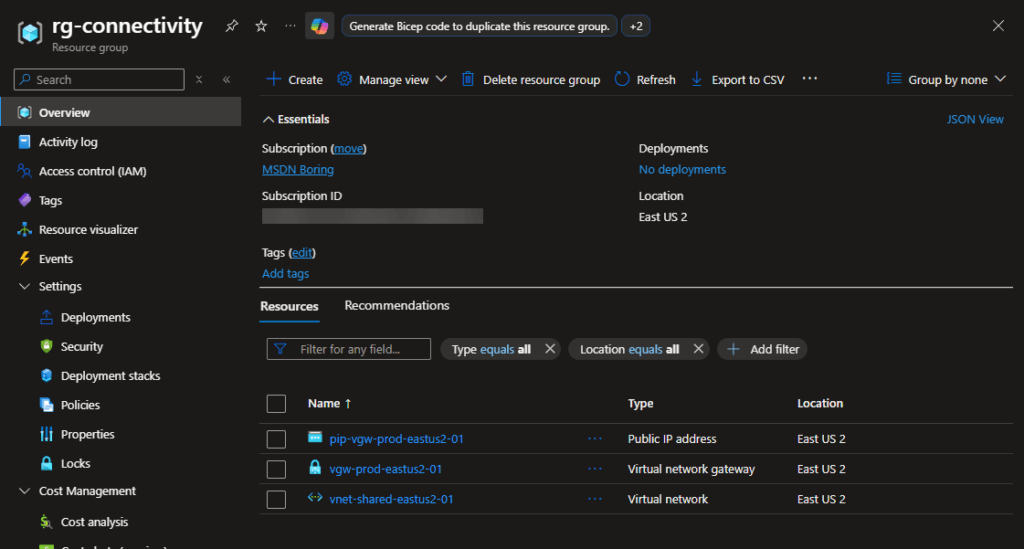
Once the script finishes, go to your Azure Portal – Resource Groups. Should see the named Resource Group with the Virtual Network sitting inside!
Local Network Gateway Deployment
Next we need to deploy the Local Network Gateway. We can perform this in the Azure Portal.I’m deploying this in the same Resource Group as my VNET Gateway since it will be used for it. Click Create

Search for local network gateway, then click Create

Basics: Now just fill out the information as applicable!
- IP address: Enter the public IP (or DNS name) of the destination you want VNET Gateway to connect to.
- Address Space(s): Enter the IP CIDR ranges of the destination. This will let the VNET Gateway know which traffic to send across the S2S connection! (static routing)

Advanced: Leave set to No. Future post I do want to do a non basic SKU using BGP!

Review & create: Click Create

Deployment took ~couple of minutes.

Create the S2S Connection
Within this step, we will have to go back and forth between the Azure Portal and Ubiquiti Unifi portal. I’ll call out which portal each part is for along with screenshots!
Azure Portal: Navigate to your Virtual Network Gateway resource that we deployed earlier. On the Overview tab, take note of what your Public IP address is so we can configure the Ubiquiti side of the connection.

In the navigate bar, click Connections then Add

Basics: Now just fill out the information as applicable!
- Connection type: Select Site-to-Site (IPsec)
- Name: Enter a name – it cannot contain spaces
- Region: Select your chosen region
Click Next

We will now need to gather some information from the Ubiquiti side of the connection. Open another browser tab and login to your Ubiquiti Cloud Gateway. We will need to create the S2S connection inside Unifi to get the Pre-Shared Key to enter into the Azure Portal.
Unifi Portal: Go to Settings -> VPN -> Site-to-Site VPN -> Create Site-to-Site VPN

Azure & Unifi Portal:
- Virtual network gateway: Select the VNET Gateway from the drop down
- Local Network Gateway: Select the LNG from the drop down
- Shared Key(PSK): Copy the Pre-Shared Key from Unifi and paste here.
Leave the rest as default, then click Next: Tags and add tags as appliable.

After validation, click Create

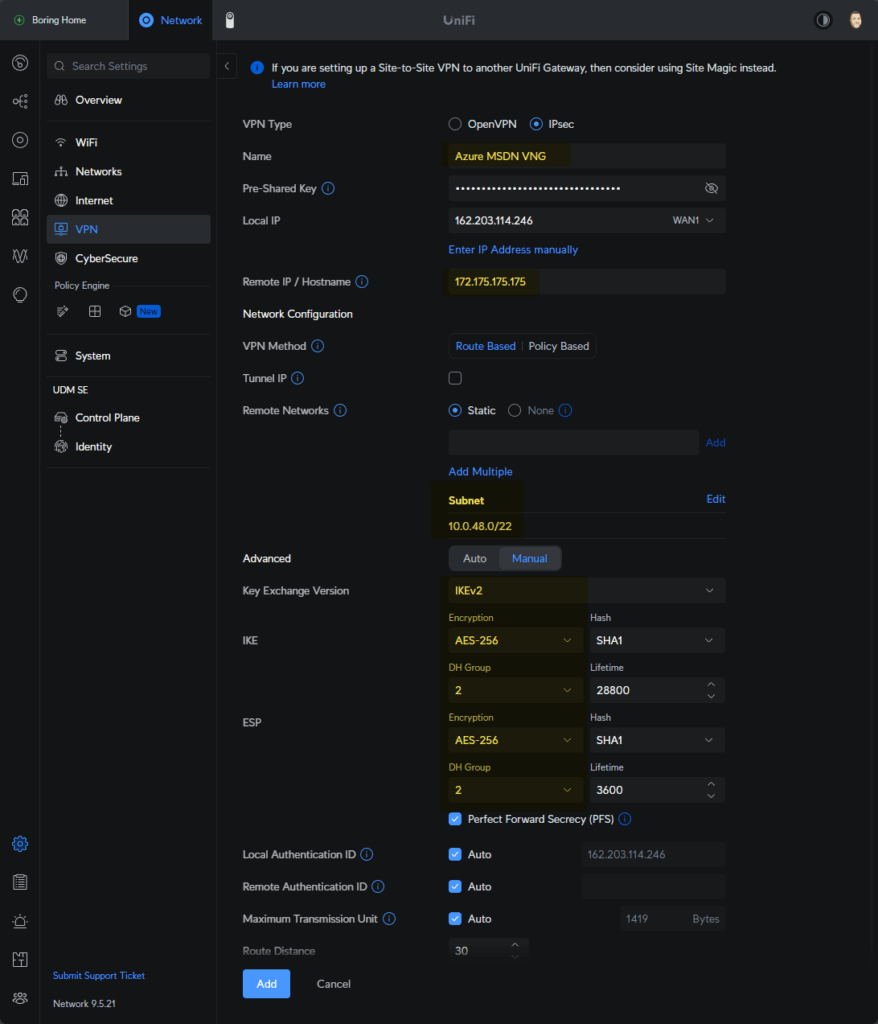
Unifi Portal: While the connection deploys, go to your Unifi portal and let’s finish configuration this side of the connection.
- Name: Enter a name to reference this connection is for your Azure VNET Gateway.
- Remote IP / Hostname: Enter the IP address of the Public IP attached to the Virtual Network Gateway that we took note of earlier.
- Remote networks: Enter the IP CIDR that you want your Unifi Gateway to send over this connection. In my environment, I entered the CIDR of the whole Virtual Network.
- Advanced: Manual
- Key Exchange Version: Set to IKEv2
- Encryption: AES-256
- DH Group: 2
Click Add
Azure Portal: The connection deployment should now be finished. Click Go to resource

Depending on refresh cycles, it could already show Connected. If not give it some more time and refresh. Once it says connected you can test the connection!

Testing the S2S Connection
Figured the quickest way to test connectivity between sites was to deploy a Virtual Machine in Azure to a Private subnet. Then I will ping it that VM from my laptop at home.
When I try to ping the Azure VM IP address, because the destination is in the CIDR range of the S2S connection (10.0.48.0/22), my Unifi Gateway sent that traffic across the S2S VPN connection to the VNET Gateway for routing.

Once I disabled the Windows Firewall on that Azure VM, ICMP started responding!

Troubleshooting Connection Issues
If you are unable to get your connection to connect, double check that you got the got the Pre-Shared Key properly copied from Unifi to the VNET Gateway connection info. Also check on the advanced options on the Unifi connection side are set properly (IKEv2/AES-256/DH-Group:2).
After validating that information, there are logs that you can also check out! On your Virtual Network Gateway, on the left navigation pane under Monitoring, click Logs. There are some queries that you can run to help track down what is happening.

Azure Monitor
Azure Monitor is a unified observability service that collects metrics, logs, and traces from applications, infrastructure, and network resources to provide end‑to‑end visibility across your Azure environment. It helps you detect issues, analyze performance, and respond with alerts and automated actions.
There are quite a few metrics that are included with no additional charge!
- Bytes Sent/Received
- Packet counts
- Flow counts
- Gateway metrics
- LB health probe status
Check it out here: Monitor – Microsoft Azure

Quick Closing
In a future post I want to deploy a non-basic SKU VNET Gateway and make it fully redundant then move into VWAN. Thank you for reading through my deployment! I hope this post is useful for your journey!
Continue the Hybrid Journey
Now that you have a VPN tunnel connecting your Azure VNet to your home lab, the next logical step is locking down how your on-premises workloads access Azure services. By default, resources like storage accounts and key vaults are still reachable over the public internet — even over the VPN, traffic can resolve to public IPs.
In my next Azure post I walk through setting up Private Endpoints, DNS Private Resolver, and Conditional Forwarders to keep all that traffic fully private end-to-end:
→ Azure Private Endpoints, DNS Private Resolver, and Conditional Forwarders: Private Access End-to-End
Other Azure posts: