
By default, most Azure services — storage accounts, key vaults, SQL databases, you name it — are reachable over the public internet. That’s fine for a quick lab, but not great when you want your on-premises workloads to talk to Azure resources without any of that traffic ever leaving your private network.
Prerequisite: This walkthrough assumes you already have a VPN tunnel between your on-premises network and your Azure VNet. If you haven’t set that up yet, check out my guide on Deploying an Azure Virtual Network Gateway first.
That’s where Private Endpoints come in. A Private Endpoint drops a Network Interface Card (NIC) directly inside your Virtual Network, giving your Azure resource a private IP address that’s only reachable from within your network. No public internet required.
The catch? DNS. Your on-premises DNS servers still resolve that storage account’s hostname to its old public IP. We need to teach them to ask Azure’s private DNS instead. To bridge that gap we’ll use Azure’s DNS Private Resolver — a fully managed, serverless DNS forwarder that lives inside your VNet — and then configure a Conditional Forwarder on your Windows DNS server to point traffic for Azure domains at it.
Here’s what we’re building end-to-end:
- Create a Private Endpoint for an Azure Storage Account (file share).
- Create a DNS Private Resolver with an inbound endpoint so on-prem DNS can reach it.
- Configure a Conditional Forwarder in Windows DNS to send
*.file.core.windows.netqueries to that resolver.
Environment note: In this walkthrough I use a storage account as the example resource, but the same pattern applies to any Azure service that supports Private Link (Key Vault, SQL, App Service, etc.). Only the resource type and DNS zone name change.
There are multiple scenarios for using these services. The scenario I am deploying is called Azure Private Resolver for virtual network and on-premises workloads. Check that link for additional scenario types!
Let’s jump in!
Creating the Private Endpoint
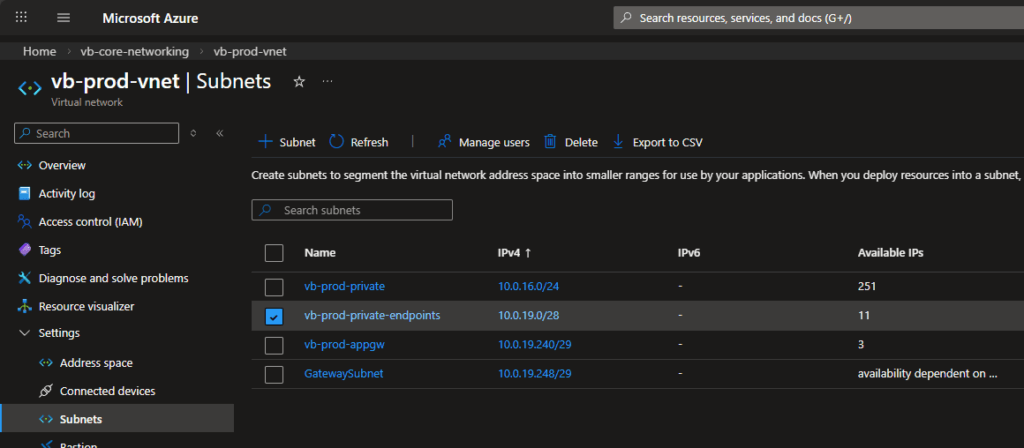
Prerequisite: Before creating any Private Endpoints, dedicate a subnet for them to live in. Each Private Endpoint consumes exactly one private IP address, so size the subnet accordingly. There’s no official Microsoft recommendation on size — it really does depend on how many endpoints you plan to deploy. A /28 (11 usable IPs) is a reasonable starting point for smaller environments. In the screenshot below you can see the vb-prod-private-endpoints subnet at 10.0.19.0/28 has been set aside just for this purpose.
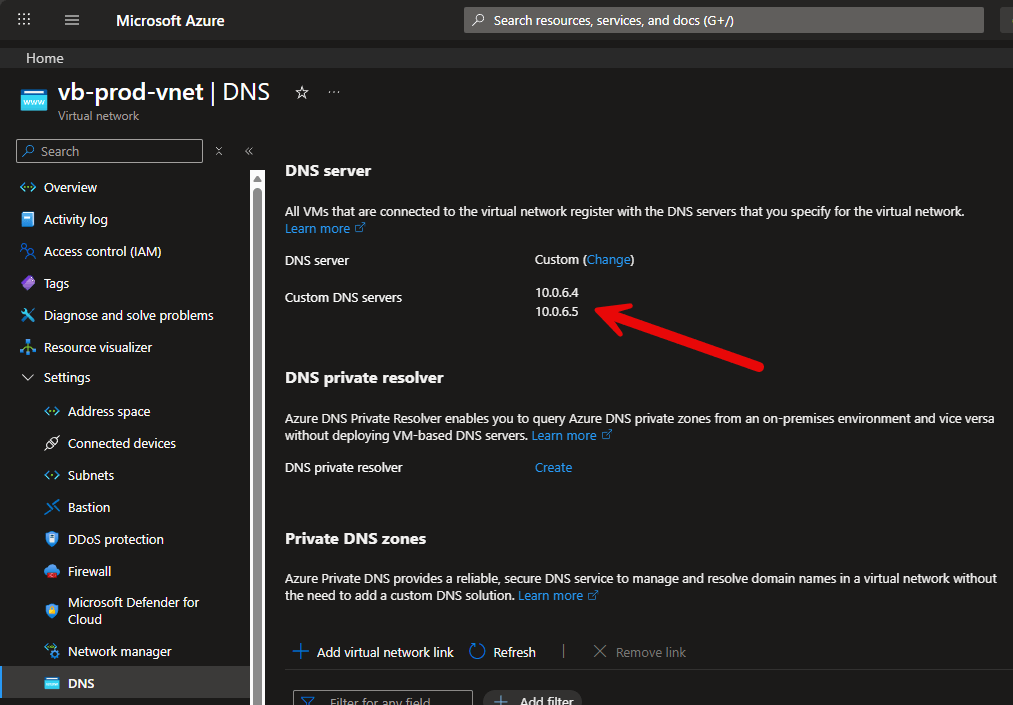
Also note that I am using Windows DNS (Active Directory Domain Controllers) as my custom DNS servers I have configured on my Virtual Network.
If you are using Azure provided DNS, you would need to configure Outbound Endpoints on your DNS Private Resolver. Click here for additional details on that setup.
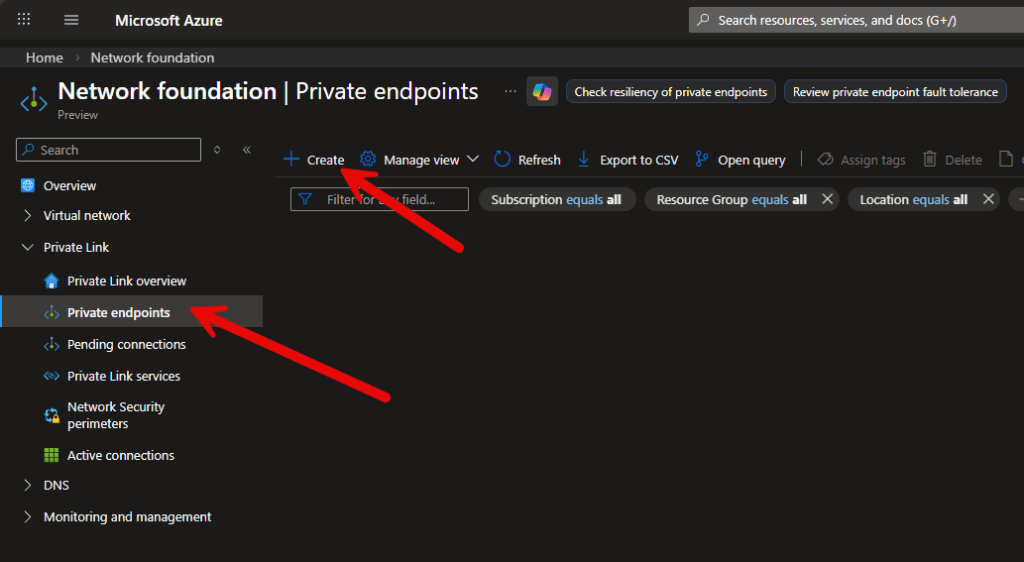
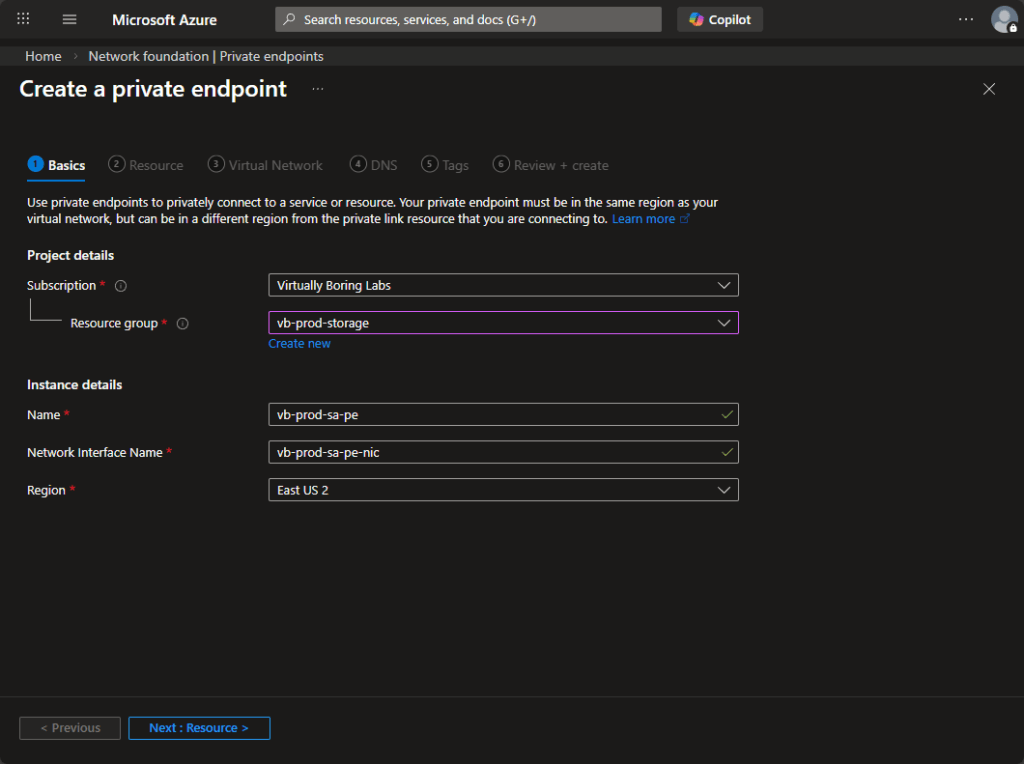
Now head to the Azure Portal and search for Private Link in the top search bar. This is your single pane of glass for everything Private Link-related — endpoints, pending connections, and more. In the left-hand navigation, click Private endpoints. Click + Create to open the creation wizard.
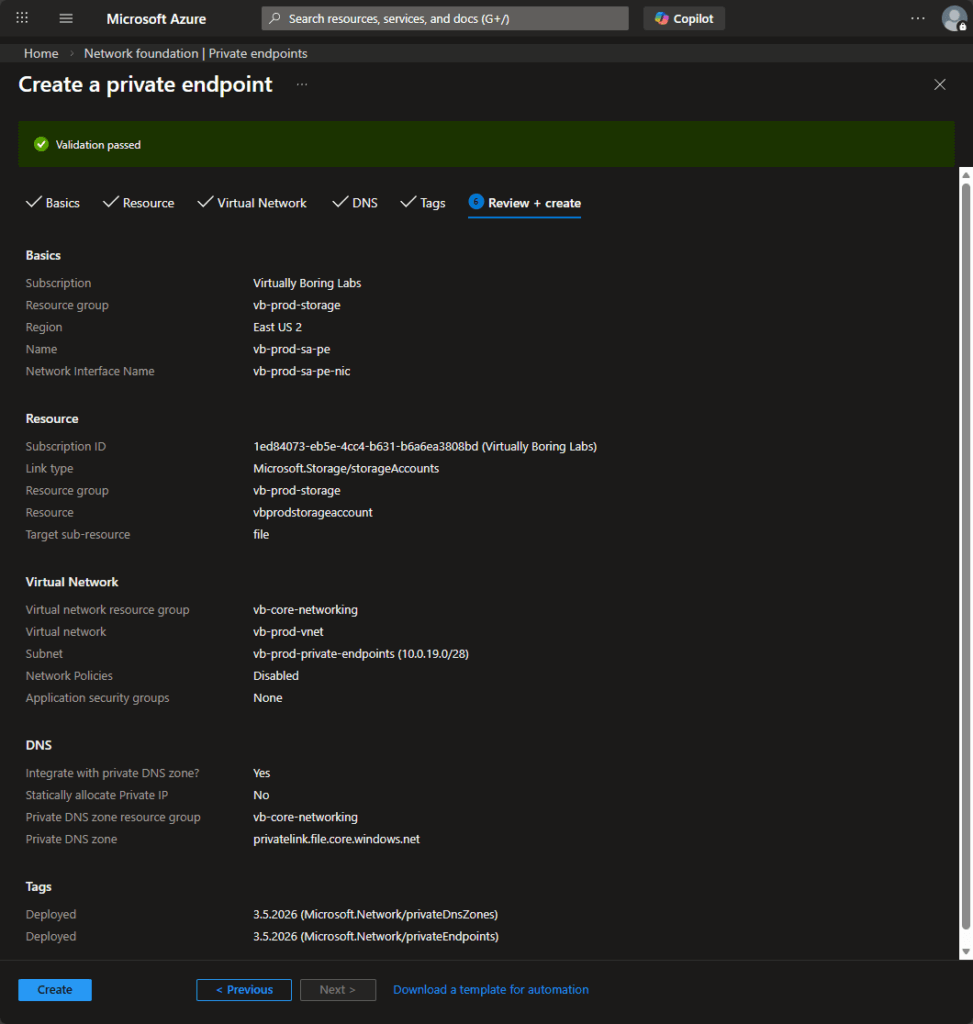
Fill in the standard project details — subscription, resource group, name, and region. A couple of tips:
- Place the Private Endpoint in the same resource group as the resource it’s connecting to — in this case
vb-prod-storage. It keeps things tidy and makes it obvious what the endpoint is for. - The Network Interface Name field auto-populates, but you can rename it. Following a consistent naming convention (e.g.
<endpoint-name>-nic) makes it easier to find later. - The region must match the region of the resource you’re connecting to. Azure will enforce this.
Click Next: Resource >.
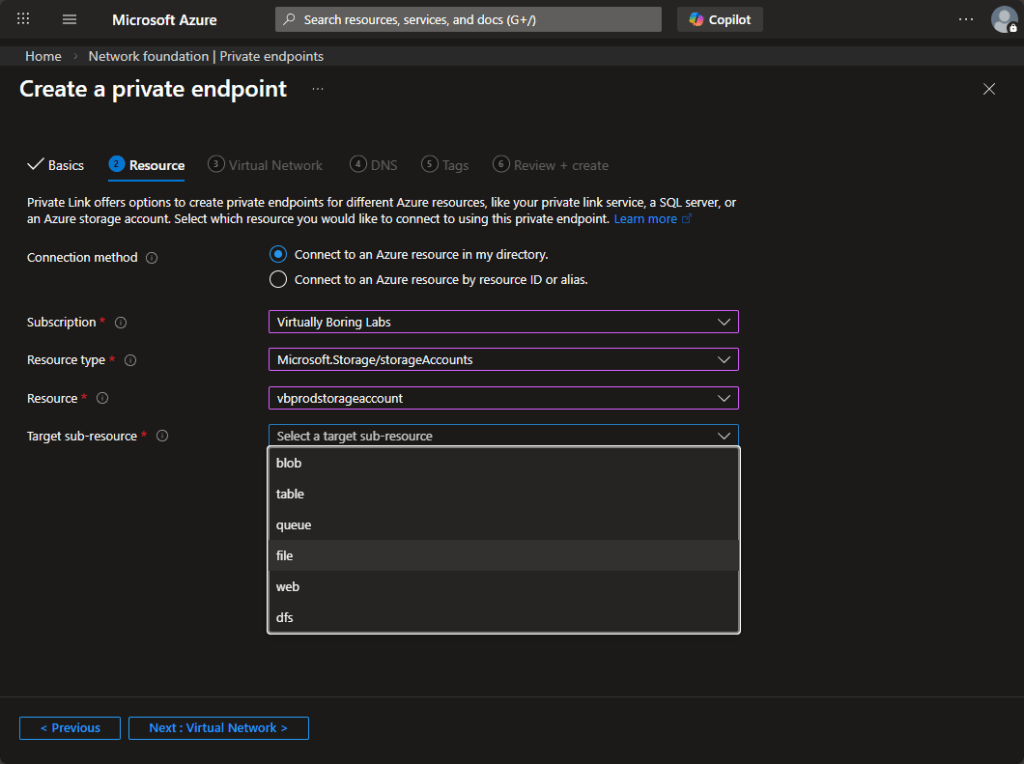
This is where you point the endpoint at the actual Azure resource you want to access privately.
- Connection method: Leave this as Connect to an Azure resource in my directory unless you’re connecting to a resource owned by someone else (partner scenario), in which case you’d use the resource ID option.
- Resource type: For my example, I selected
Microsoft.Storage/storageAccounts. - Resource: Pick your storage account from the dropdown.
- Target sub-resource: This is the service within the storage account you want to expose privately. Options include
blob,file,queue,table,web, anddfs. Each one gets its own Private Endpoint and its own DNS zone. We’re selectingfilefor Azure Files.
Click Next: Virtual Network >.
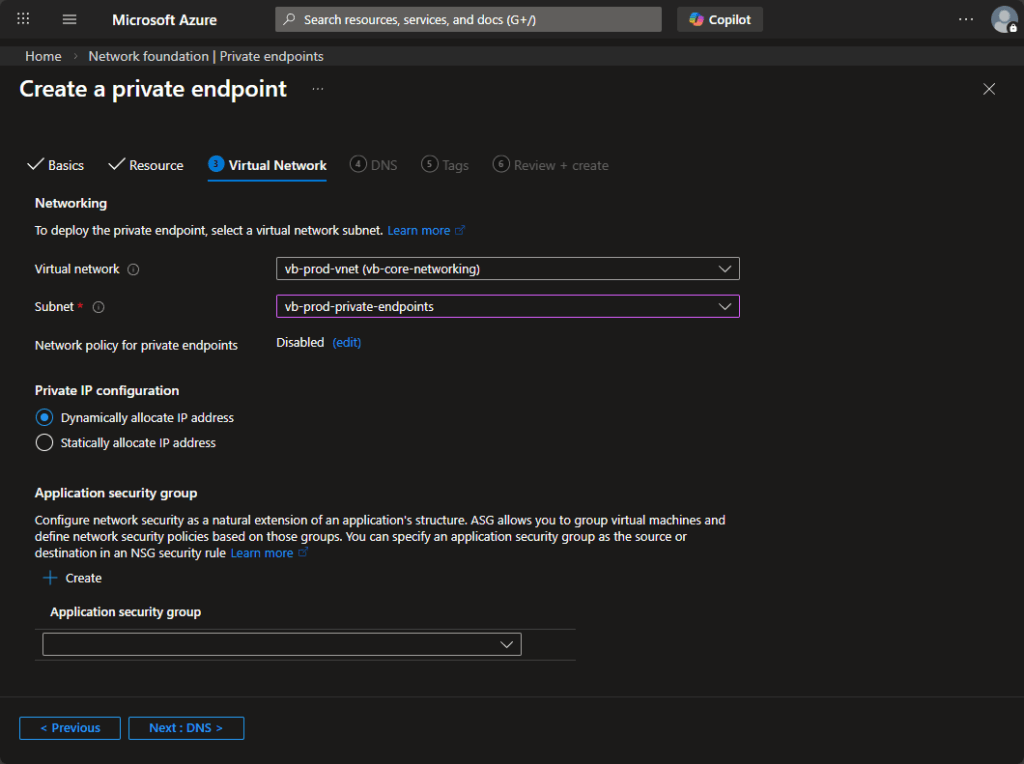
Virtual Network: Select the VNet and — importantly — the dedicated Private Endpoints subnet you created earlier. Azure will pull a private IP from that subnet’s pool and attach it to the NIC.
- IP configuration: Dynamic allocation is fine for most cases. Only choose static if you need to pin this endpoint to a predictable IP (e.g. you’re hardcoding it in a firewall rule or a hosts file).
- Network policy for private endpoints: You’ll see this is Disabled. This means NSG rules and route tables attached to this subnet don’t apply to Private Endpoint traffic by default. You can enable it if you need NSG control over your endpoint traffic, but that’s an advanced scenario.
- Application Security Group: Optional — skip it for now unless you’re already using ASGs in your environment.
When you create a Private Endpoint, Azure needs a DNS record to map the resource’s public hostname (e.g. vbprodstorageaccount.file.core.windows.net) to its new private IP. That record lives in a Private DNS Zone.
The golden rule: one Private DNS Zone per service type, not per endpoint.
If you have five storage accounts each with a file Private Endpoint, all five endpoints share a single Private DNS Zone named privatelink.file.core.windows.net. Each endpoint just adds its own A record to that zone. Creating a new zone per endpoint is a common mistake that leads to DNS resolution headaches down the road.
The Private DNS Zone naming convention for common services:
- Azure Files:
privatelink.file.core.windows.net - Azure Blob:
privatelink.blob.core.windows.net - Azure Key Vault:
privatelink.vaultcore.azure.net - Azure SQL:
privatelink.database.windows.net
For this deployment, this is the first Private Endpoint for Azure Files, so Azure will create a brand-new privatelink.file.core.windows.net zone. Place it in your networking hub resource group (in this case vb-core-networking) — not in the spoke or workload resource group. DNS zones are a shared infrastructure resource and belong with the rest of your network foundation.
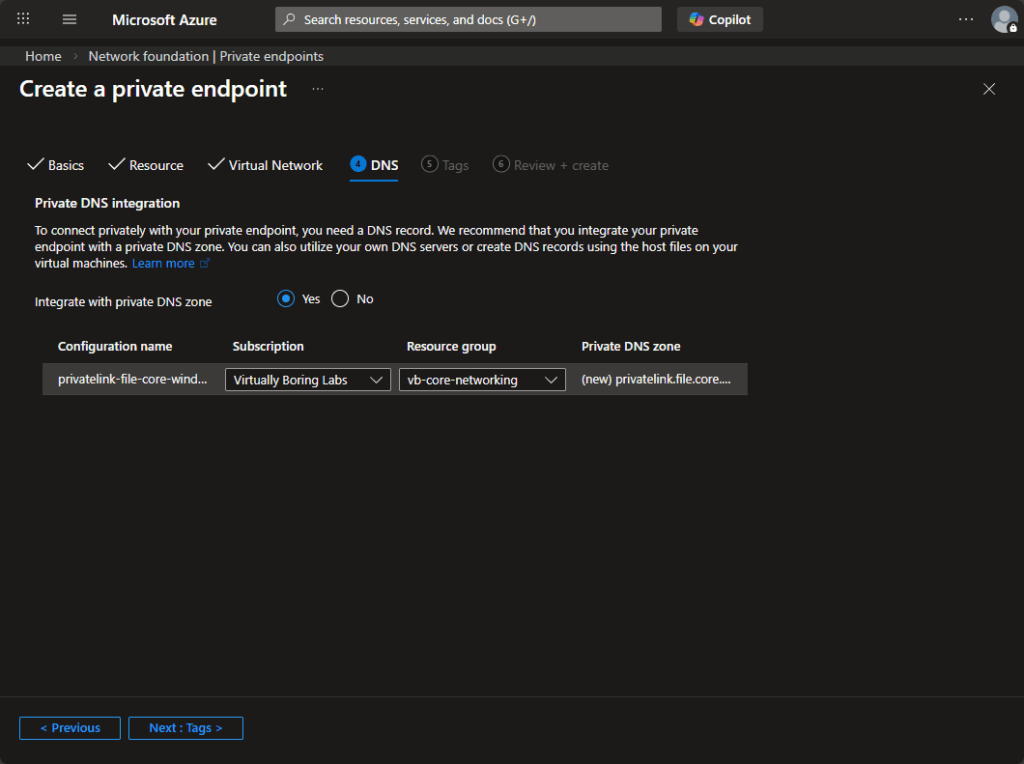
Leave Integrate with private DNS zone set to Yes. Skip Tags unless you need them, then click through to Review + create.
Give everything a once-over. Key things to confirm before clicking Create:
- Resource group matches the resource you’re connecting to (
vb-prod-storage). - The correct target sub-resource (
file) is selected. - Subnet is your dedicated Private Endpoints subnet.
- A new (or existing) Private DNS Zone is listed under DNS.
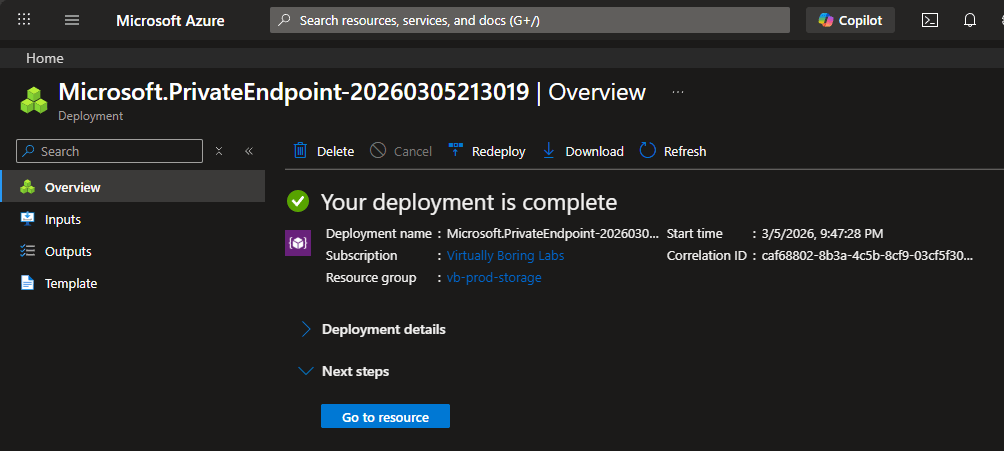
Click Create. Deployment took roughly ~3 minutes — grab a coffee. Once the deployment completes, you’ll see the familiar green checkmark confirmation screen.
What just happened? Azure created a NIC inside your
vb-prod-private-endpointssubnet and assigned it a private IP. It also created (or updated) a Private DNS Zone with an A record pointing the storage account’s hostname to that private IP. Azure-hosted workloads on the same VNet can now resolve and connect to the storage account privately. On-prem machines, however, still can’t — yet. That’s next.
Create Private DNS Resolver
Here’s the problem: your on-premises DNS server (Windows DNS in this case) has no idea that privatelink.file.core.windows.net even exists. When a machine on-prem tries to resolve your storage account, it asks the Windows DNS server, which asks the public internet, which happily returns the public IP. We don’t want that.
The Azure DNS Private Resolver is the bridge. It’s a fully managed, serverless DNS service that sits inside your VNet and can answer queries against your Private DNS Zones. No VMs to patch, no DNS server software to configure — Azure handles all of that. You just give it an inbound IP address, and your on-premises DNS server forwards Azure domain queries to that IP.
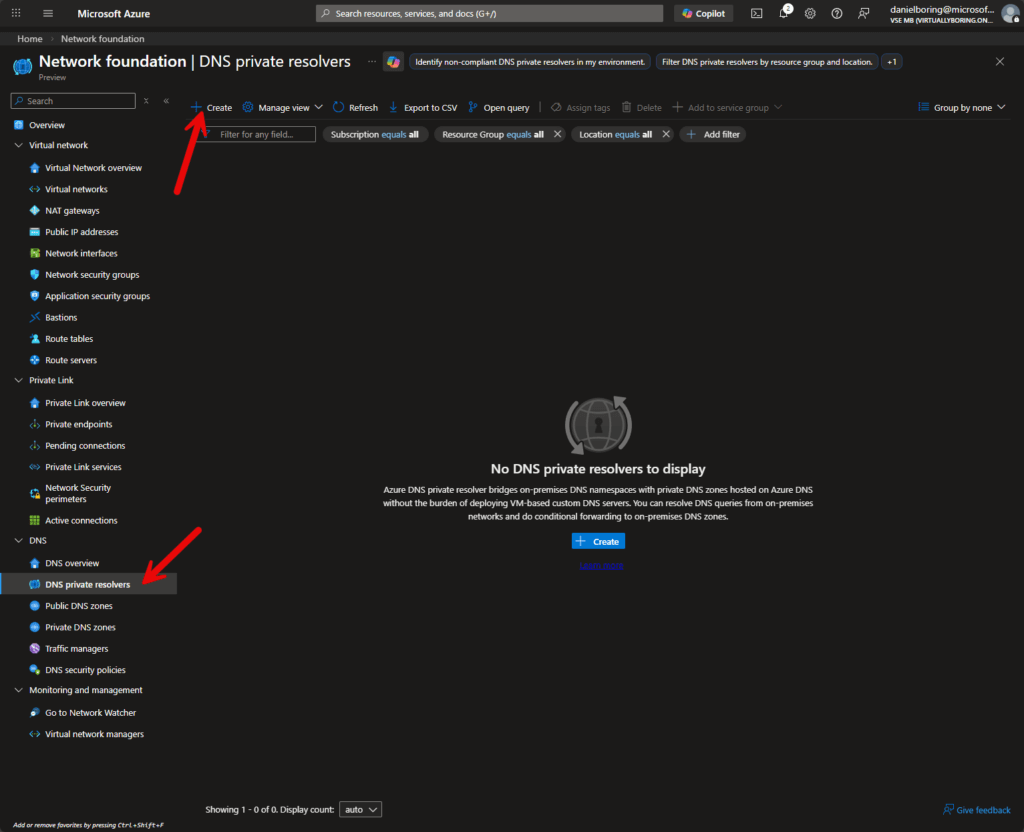
To find it, go back to the Network foundation blade (or search for it in the portal). Scroll down in the left nav to the DNS section and click DNS private resolvers.
Click + Create.
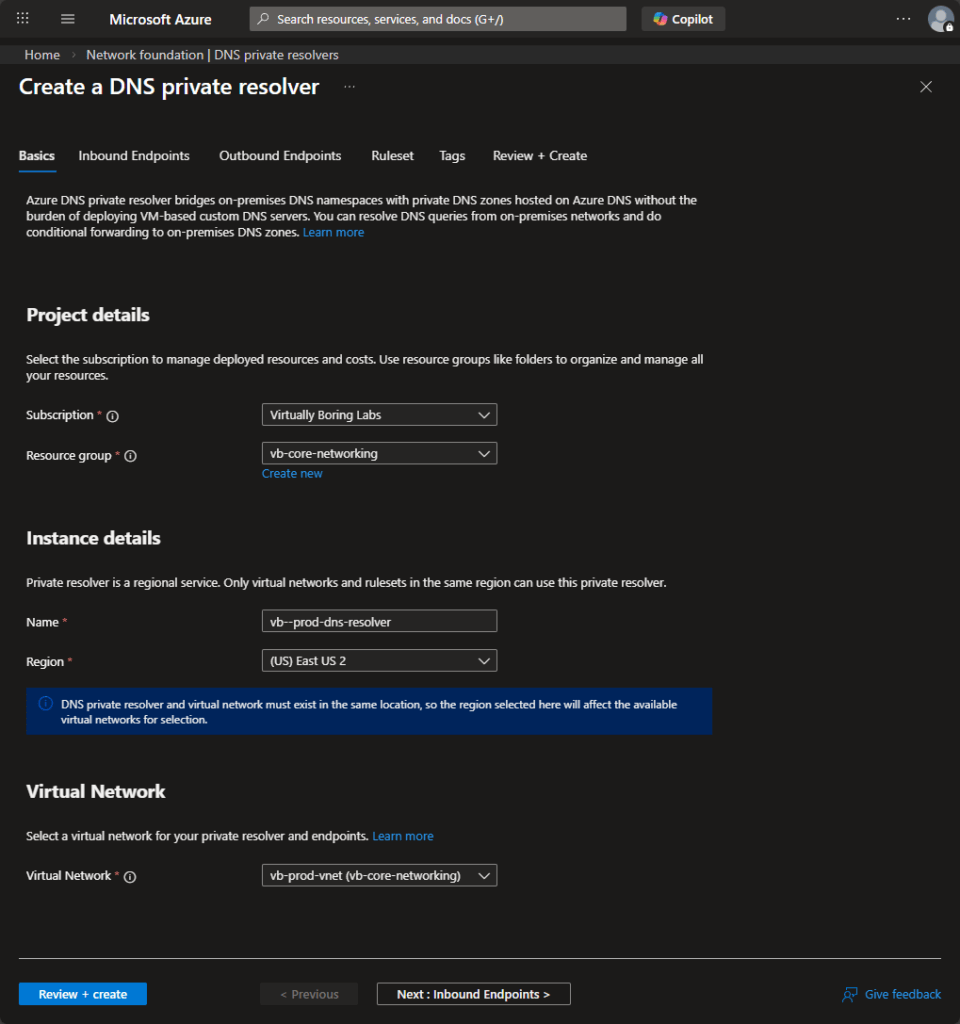
Fill in the standard fields. A few things to note:
- Resource group: Put this in your networking hub resource group (
vb-core-networking). Like the Private DNS Zone, the resolver is shared infrastructure. - Region: Must match the region of your VNet. The resolver is a regional resource — it can only serve VNets in the same region.
- Virtual Network: Select your hub VNet (
vb-prod-vnet). The resolver will deploy its inbound endpoint into a subnet of this VNet.
Click Next: Inbound Endpoints >.
The inbound endpoint is the IP address that external DNS servers (your Windows DNS server on-prem) will forward queries to. Think of it as the “front door” of the resolver.
- Click + Add an endpoint and give it a name.
- Select a subnet for the inbound endpoint. This should be its own dedicated subnet — not the same one as your Private Endpoints. In this case,
vb-prod-dnsResolvers (10.0.19.16/28)has been set aside for this purpose. - Azure will assign a private IP from that subnet — make note of it, you’ll need it when configuring the Conditional Forwarder in Windows DNS.
Skip past Outbound Endpoints and Rulesets — those are used for the reverse direction (forwarding from Azure to on-prem DNS), which isn’t needed for this scenario. Add tags if applicable, then click through to Review + Create.
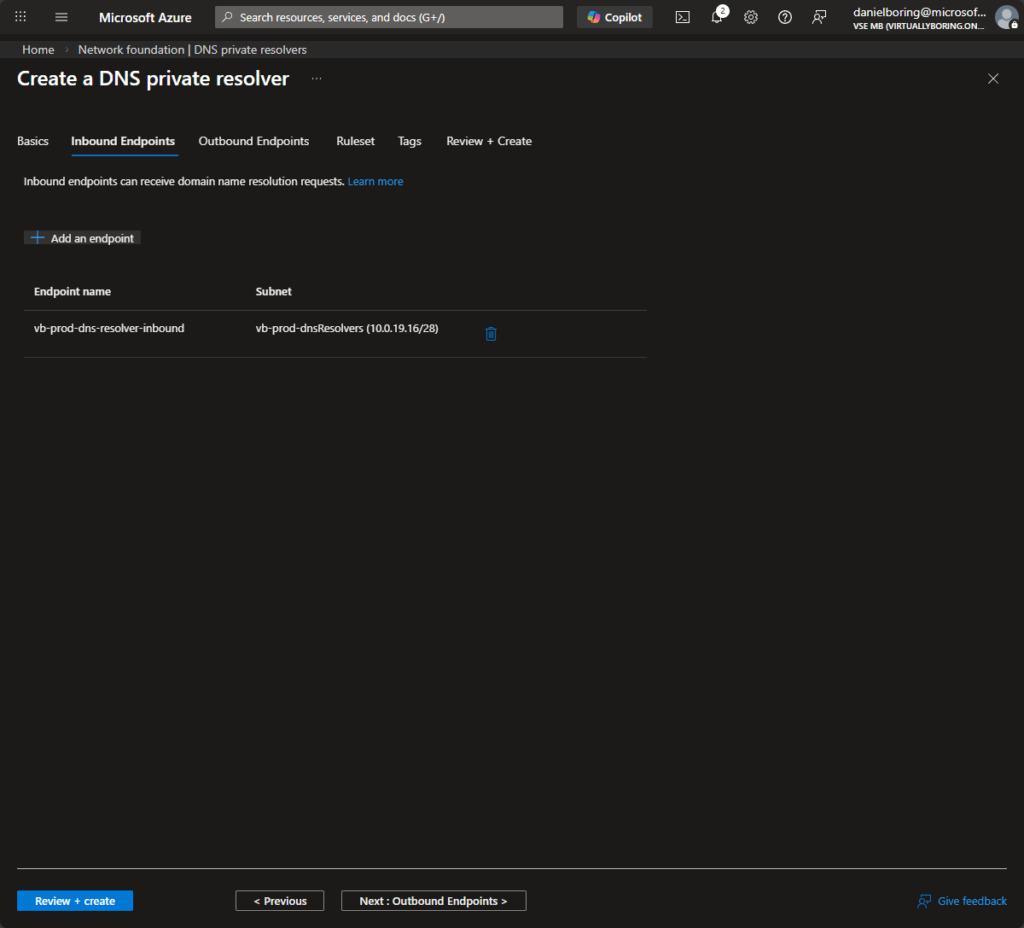
Confirm the summary looks right — particularly the inbound endpoint name and subnet — then click Create.
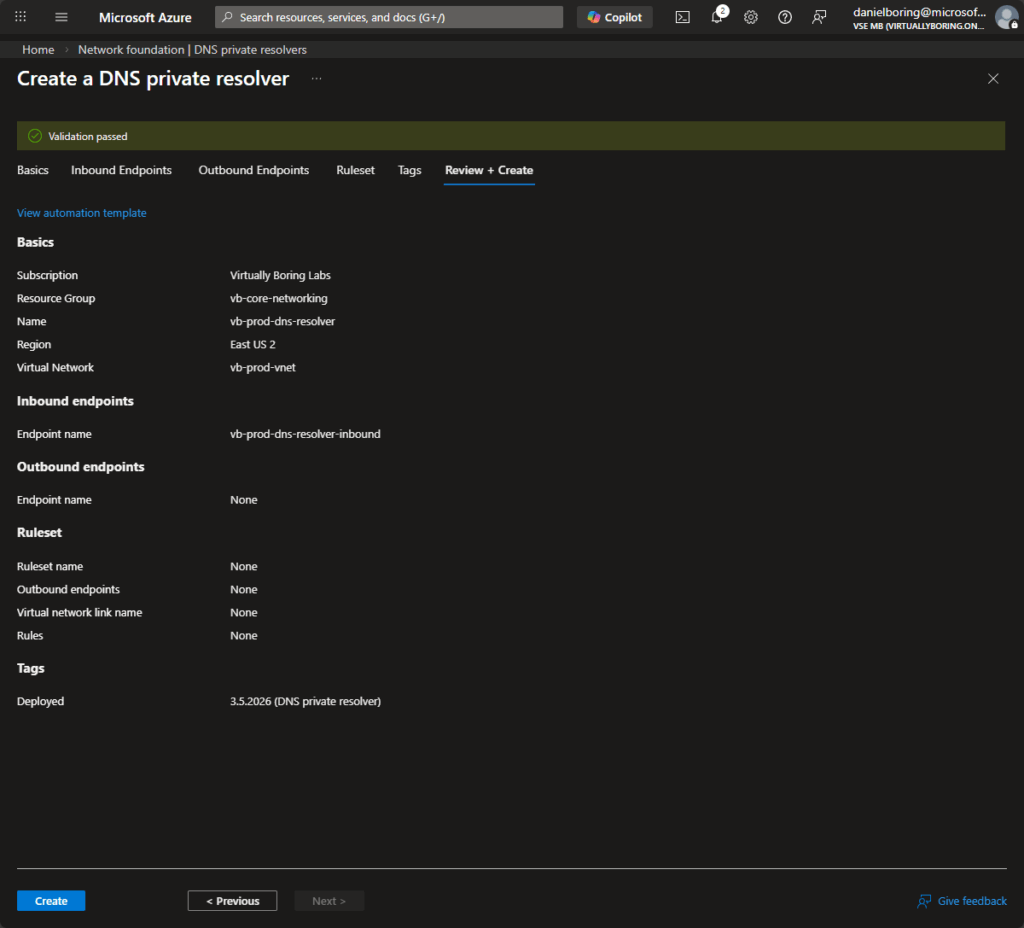
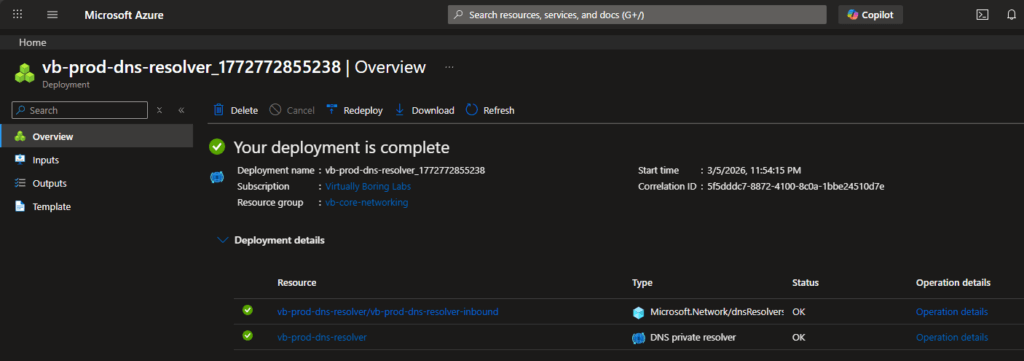
Deployment took roughly ~2 minutes.
Quick Test
Before touching Windows DNS, let’s confirm the current state of affairs. From an on-premises machine, run an nslookup against the storage account’s file endpoint:
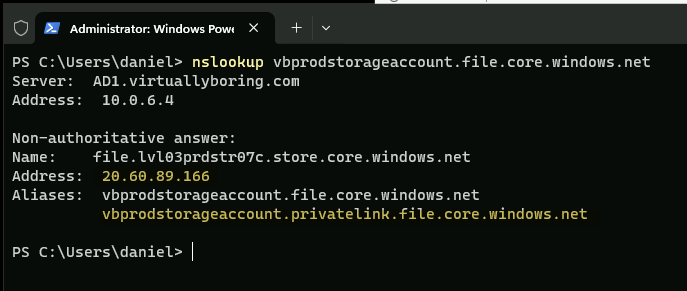
Notice the result: 20.60.89.166. That’s a public Microsoft IP. Traffic from on-prem workloads would traverse the internet to reach the storage account, bypassing our Private Endpoint entirely. This is exactly the problem we’re fixing.
Why is this happening? The Private DNS Zone (
privatelink.file.core.windows.net) exists only inside Azure. Your Windows DNS server has never heard of it. When it can’t find a local answer, it falls back to asking a public resolver, which returns the public IP. We need to tell Windows DNS: “Hey, for anything ending infile.core.windows.net, don’t ask the internet — ask the Azure DNS Private Resolver instead.”
Windows DNS – Conditional Access
Open DNS Manager on your Windows DNS server (typically your domain controller). We’re going to do two things:
- (Optional but recommended) Create an A Record for the DNS Private Resolver’s inbound IP, so the Conditional Forwarder shows a friendly FQDN instead of just a raw IP.
- Create the Conditional Forwarder itself.
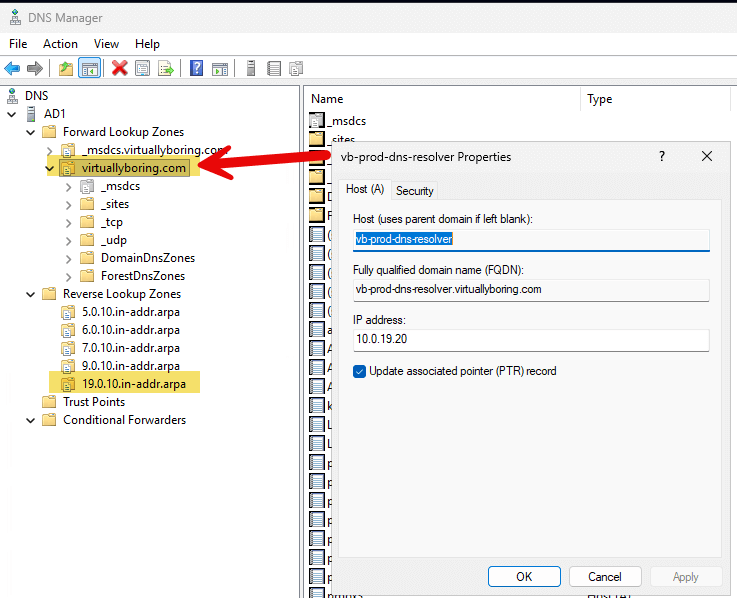
Step 1 (Optional): Add an A Record for the DNS Resolver
In DNS Manager, expand Forward Lookup Zones and click on your domain zone (in this case virtuallyboring.com). Right-click and choose New Host (A or AAAA).
- Host name:
vb-prod-dns-resolver - IP address:
10.0.19.20(the inbound endpoint IP from earlier) - Check Create associated pointer (PTR) record if you have a reverse lookup zone for that subnet — this is what makes the FQDN show up and validate in the next step.
This is technically optional — the Conditional Forwarder works with just the raw IP. But having the FQDN registered means that when Windows DNS validates the forwarder, it can resolve the server name cleanly and display it in the UI. Think of it as tiny DNS breadcrumbs: if anyone ever looks at that IP and wonders what it is, the PTR record tells them.
Step 2: Create the Conditional Forwarder
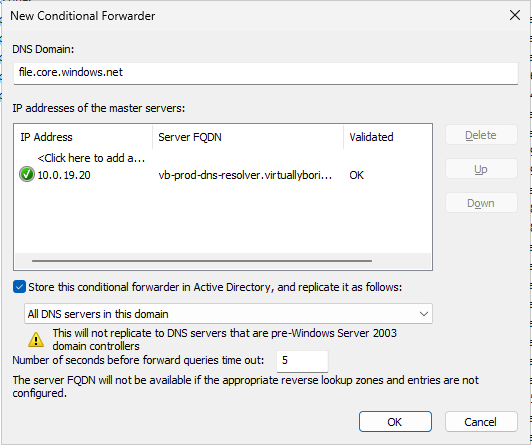
In DNS Manager, right-click Conditional Forwarders in the left tree and select New Conditional Forwarder.
- DNS Domain:
file.core.windows.net— this tells Windows DNS to use this forwarder for any query ending in that domain. - IP addresses of the master servers: Enter
10.0.19.20(the resolver’s inbound endpoint IP). Once you tab away, DNS Manager will attempt to validate the entry. If you created the A and PTR records in Step 1, it will resolve tovb-prod-dns-resolver.virtuallybori...and show OK. - Store this conditional forwarder in Active Directory: Check this box and set it to replicate to All DNS servers in this domain. This ensures all your domain controllers automatically pick up the forwarder — you don’t have to configure it manually on each one.
Click OK. That’s it on the Windows DNS side.
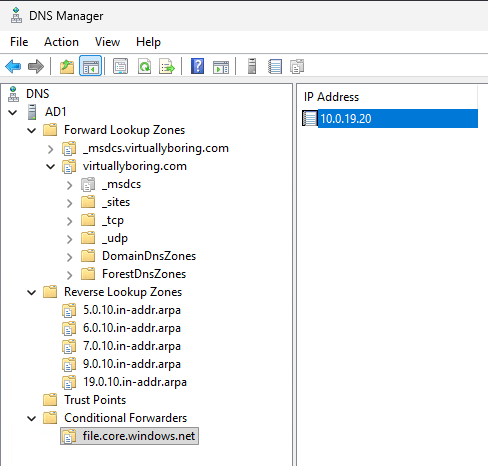
Now you have a Conditional Forwarder added!
Final Test
Head back to PowerShell. Flush the local DNS cache first so we’re working with fresh results, then re-run the lookup:
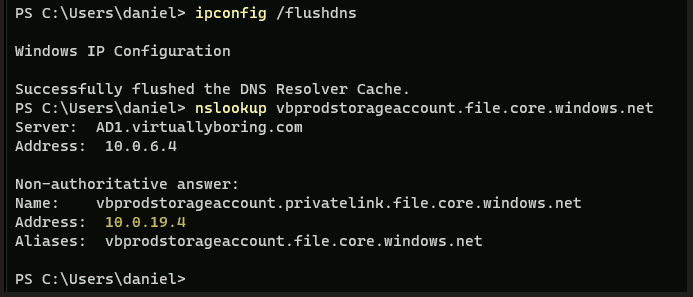
Huzzah! Instead of the public IP 20.60.89.166, we’re now resolving to 10.0.19.4 — the private IP assigned to our Storage Account’s Private Endpoint NIC. Traffic from both Azure workloads and on-prem machines will now flow privately, never touching the public internet.
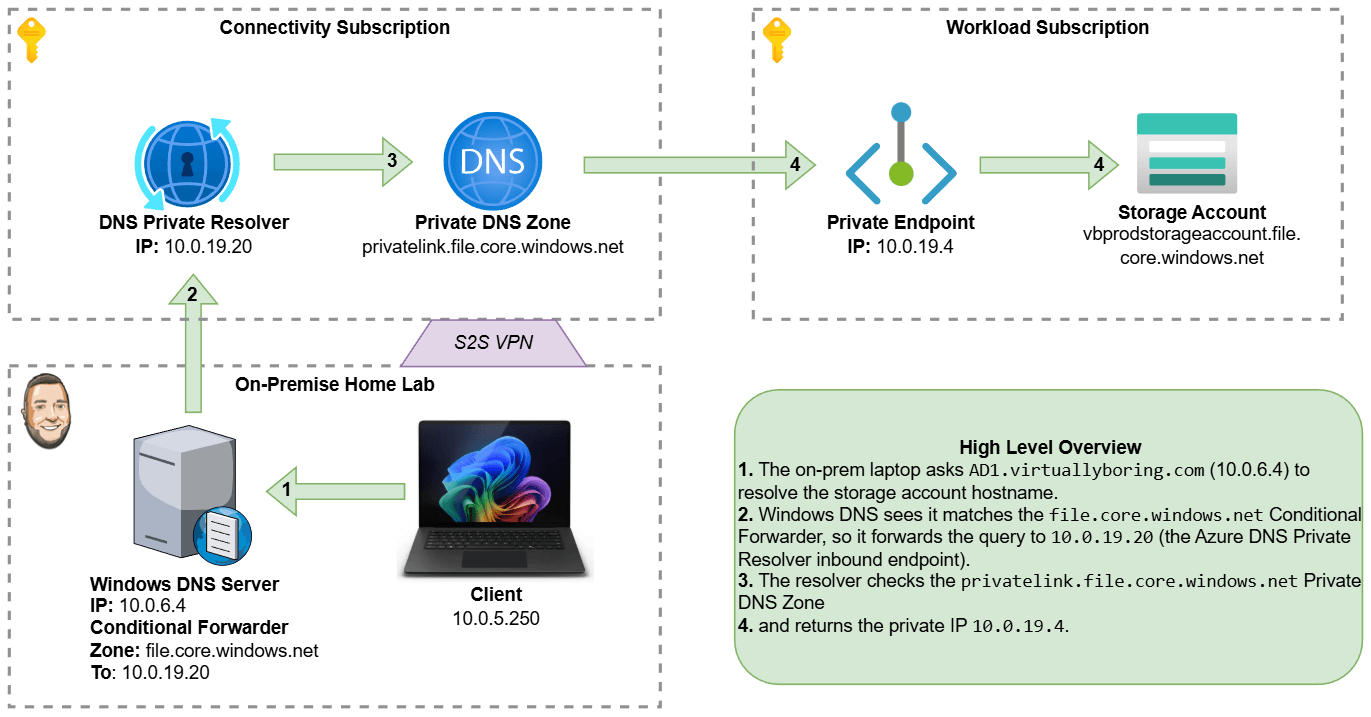
What’s happening under the hood: The on-prem machine asks
AD1.virtuallyboring.com(10.0.6.4) to resolve the storage account hostname. Windows DNS sees it matches thefile.core.windows.netConditional Forwarder, so it forwards the query to10.0.19.20(the Azure DNS Private Resolver inbound endpoint). The resolver checks theprivatelink.file.core.windows.netPrivate DNS Zone and returns the private IP10.0.19.4. Done.
Additional Design Considerations
Blast Radius of an Overly Specific Conditional Forwarder
In this walkthrough, the Conditional Forwarder targets file.core.windows.net rather than the broader core.windows.net or windows.net. That’s intentional. The more specific your forwarder domain, the smaller the blast radius if something goes wrong with the resolver. If you forward all of windows.net to your Azure resolver and the resolver has a hiccup, you’ve just broken DNS resolution for a very wide swath of Microsoft services. Start specific — one forwarder per Azure service type you’re privately connecting to — and expand only if you have a compelling reason.
Highly Available DNS Private Resolver
A single DNS Private Resolver inbound endpoint is a potential single point of failure. For production workloads, deploy a second inbound endpoint in a different Availability Zone (or even a different region if you’re geo-distributed). Configure both IPs in your Conditional Forwarder’s master server list — Windows DNS will try them in order and fail over automatically if the first one doesn’t respond.
Highly Available Private Endpoint
Private Endpoints themselves are zone-redundant within a region — Azure handles the availability of the underlying NIC. That said, if you’re connecting to a resource that supports geo-replication (like an Azure Storage Account with GRS), consider whether you need a Private Endpoint in your secondary region as well. A failover to a secondary region won’t do much good if traffic to that region still hits a public IP.
Closing Thoughts
Getting Private Endpoints working end-to-end is one of those things that sounds straightforward until you hit the DNS piece — and then suddenly everyone’s resolving public IPs and wondering what went wrong. Hopefully this walkthrough makes the DNS chain click!
To recap what we built: a Private Endpoint giving our storage account a private IP, a DNS Private Resolver acting as the bridge between on-prem DNS and Azure’s private DNS zones, and a Conditional Forwarder in Windows DNS tying it all together. Three moving parts, but once it’s wired up it should just work.
Related Azure Posts:
- Deploying Azure Virtual Network Gateway Basic: A How-To Guide — set up the site-to-site VPN tunnel that makes private endpoint access possible
- How to Takeover an Unmanaged Directory in Azure