
Ubuntu 26.04 LTS dropped last month, and instead of doing what I’d normally do — build a template, snapshot it, and slowly watch it age — I decided it was finally time to actually dig into Cloud-Init.
If you’ve built Proxmox templates before, you know the drill: create a VM, install the OS, install your packages, sysprep it, convert it to a template, and then clone it every time you need a new box. It works, but every clone inherits whatever state the template was in the day you built it. Packages drift. You’re manually cleaning up machine IDs and SSH host keys after every clone. Spin up ten VMs for a lab build and you’ve got ten rounds of post-boot cleanup ahead of you.
Cloud-Init sidesteps all of that. Instead of a fat, opinionated image, you start with a minimal cloud image — the same kind AWS, Azure, and GCP use under the hood. The image carries no fixed identity. When you clone it and boot it, Proxmox injects your config (username, SSH key, hostname, network settings) via a virtual CD-ROM drive, and Cloud-Init configures the VM from the inside on first boot. Clean machine ID, unique SSH host keys, fully configured — before you even open a terminal.
The real unlock is that your config is a YAML file. Want ten identical VMs? Same file, ten times. Want to add a package or a user? Edit the file. Your infrastructure becomes something you can version, reuse, and actually reason about — instead of a template you’re scared to touch because you don’t remember what’s in it.
That’s why I built this. Here’s exactly how I did it on Proxmox VE 9.2.3 with Ubuntu 26.04 LTS “Resolute Raccoon.” Still on Proxmox 8? I’d get the cluster current first — here’s how I upgraded my Proxmox cluster from version 8 to 9.
What is Cloud-Init, Actually?
Cloud-Init is an industry-standard first-boot initialization system — the same one AWS, Azure, and GCP use under the hood. Instead of manually clicking through an Ubuntu installer and then scrubbing machine IDs and SSH host keys from the image, you start with a pre-built minimal “cloud image” designed to be generic and stateless.
When you clone it and boot it, Cloud-Init reads a small config — hostname, username, SSH key, network settings — that Proxmox injects via a virtual CD-ROM drive. The VM configures itself automatically in seconds. No manual post-boot setup, no configuration drift, no forgotten hostname changes causing weird network issues two weeks later.
One important thing to understand upfront: Cloud-Init only runs once — on first boot. It’s not a service that re-applies config every time the VM starts. After that first boot, it stamps a flag on the VM and never runs again. Rebooting a running VM doesn’t pull fresh packages or re-apply settings. If you want a fresh, fully updated machine, the workflow is to clone the template again — not reboot an existing one. That distinction shapes everything about how you operate day-to-day with Cloud-Init.
Why Shared Storage Changes the Storage Decision
On a single node, local-lvm is fine. On a cluster, it creates a real problem: the template only exists on the node you built it on. Clones default to that same node’s local storage, which means no live migration without offline disk moves, no HA eligibility, and you’d need a copy of the template on every node if you want flexibility.
Storing the template on shared storage (I’m using Ceph) solves all of this. Any node can clone directly from it, clones live on shared storage by default, and those VMs are immediately eligible for live migration and Proxmox HA — no extra configuration needed. If you’re on a single-node setup, just substitute local-lvm anywhere you see ceph_pool below. Everything else is identical.
The Walkthrough
What you’ll need: Proxmox VE (I’m on 9.2.3, kernel 7.0.6-2-pve), a configured Ceph pool or shared storage, SSH access to a node, and about 10 minutes.
Step 1: Download the Ubuntu 26.04 Cloud Image
SSH into your Proxmox node and grab the official image:
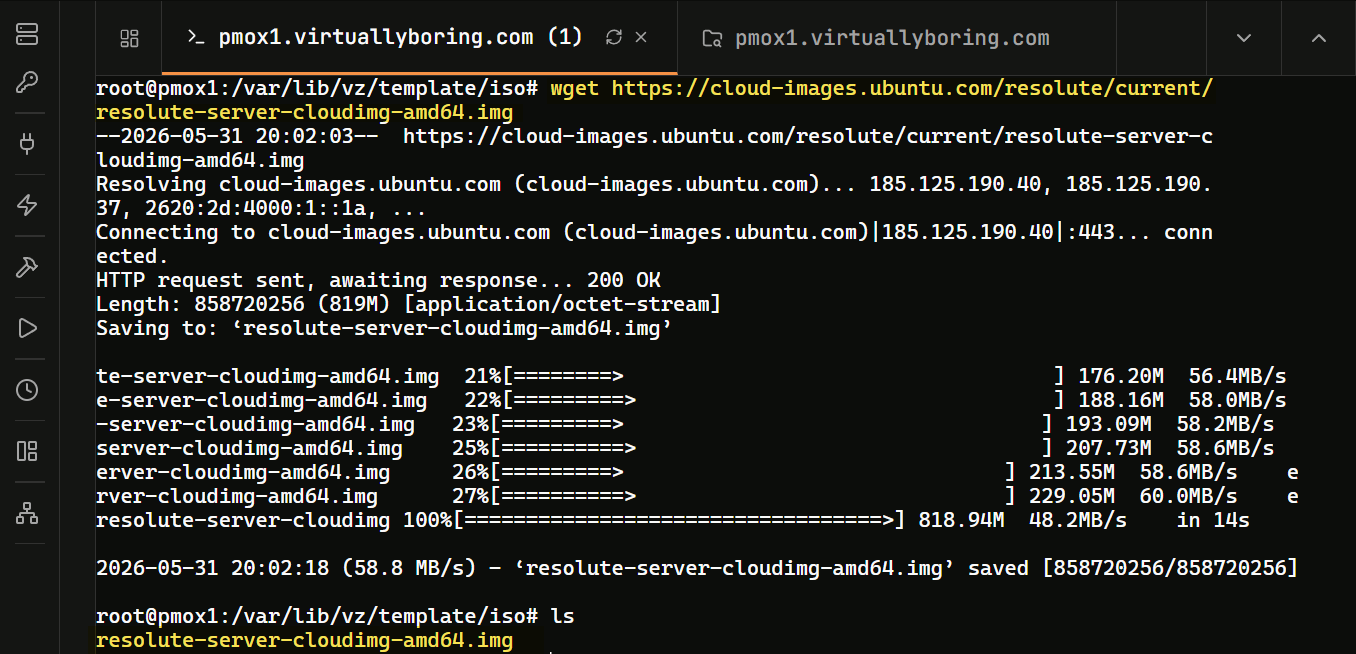
cd /var/lib/vz/template/iso/
wget https://cloud-images.ubuntu.com/resolute/current/resolute-server-cloudimg-amd64.imgCode language: JavaScript (javascript)
Verify it landed with ls -lh resolute-server-cloudimg-amd64.img — you should see around 819M. This is a minimal server image: no desktop, no extras.
Step 2: Inject the QEMU Guest Agent
Ubuntu cloud images ship intentionally lean. The QEMU Guest Agent — which lets Proxmox read the VM’s IP address and send clean shutdown signals from the UI — isn’t included. We inject it directly into the image file before the VM ever boots using virt-customize.
Install the tool:
apt update && apt install -y libguestfs-tools
Then inject the agent:
virt-customize -a resolute-server-cloudimg-amd64.img --install qemu-guest-agentCode language: CSS (css)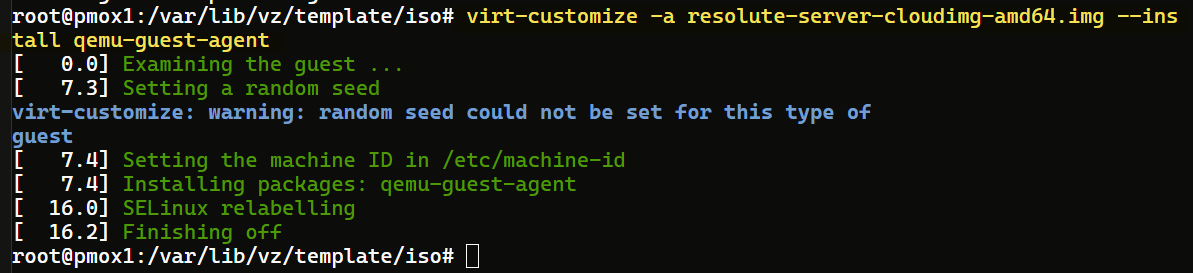
You’ll see a timestamped log as it works. The random seed warning is harmless — cloud images don’t persist a seed by design. What matters: Installing packages: qemu-guest-agent and Finishing off.
Step 3: Create the VM Shell
Build an empty hardware profile — chassis only, no OS yet:
qm create 9000 --name "ubuntu-2604-cloudinit" --memory 2048 --cores 2 --net0 virtio,bridge=vmbr0Code language: JavaScript (javascript)
VM ID 9000 keeps this in the template range (9000+), visually separated from runtime VMs in the sidebar. Silent return means success.
Step 4: Import and Attach the Disk
Import the cloud image into your Ceph pool:
qm importdisk 9000 resolute-server-cloudimg-amd64.img ceph_poolCode language: CSS (css)Single-node setup? Swap
ceph_poolforlocal-lvmhere and throughout. Everything else stays identical.
The image expands from its compressed 819MB to 3.5GB on Ceph — that’s the actual provisioned size. When complete:
unused0: successfully imported disk 'ceph_pool:vm-9000-disk-0'Code language: JavaScript (javascript)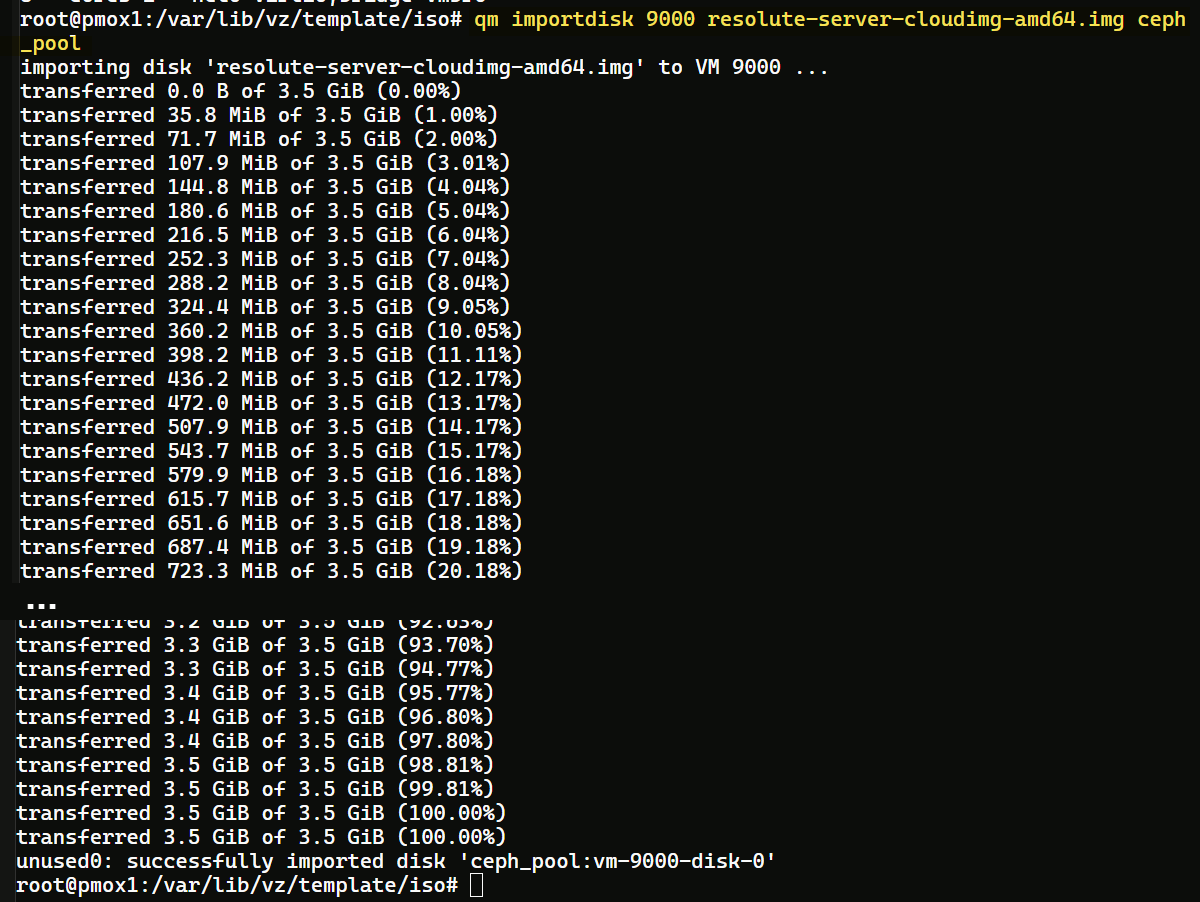
Now attach it on a VirtIO SCSI controller — the highest-performance option, and what Ubuntu cloud images expect:
qm set 9000 --scsihw virtio-scsi-pci --scsi0 ceph_pool:vm-9000-disk-0Code language: JavaScript (javascript)
Step 5: Add the Cloud-Init Drive
This is what makes the whole thing work — a virtual CD-ROM that Proxmox uses to pass your first-boot config into the VM:
qm set 9000 --ide2 ceph_pool:cloudinitCode language: JavaScript (javascript)
Proxmox immediately generates a blank Cloud-Init ISO. Each clone you create gets its own copy, populated with whatever config you set in the Cloud-Init tab.
Step 6: Boot Order, Serial Console & QEMU Agent
Three quick settings, each with a specific reason:
qm set 9000 --boot order=scsi0
qm set 9000 --agent enabled=1
qm set 9000 --serial0 socket --vga serial0Code language: JavaScript (javascript)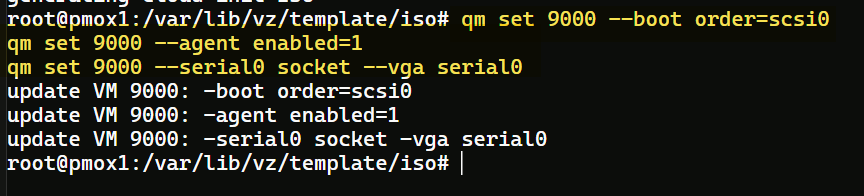
--boot order=scsi0— boot from disk, not the CD-ROM--agent enabled=1— tells Proxmox to talk to the guest agent we injected--serial0 socket --vga serial0— redirects console output to a serial socket; skip this and you’ll get a black screen in the web console because cloud kernels don’t load VGA drivers
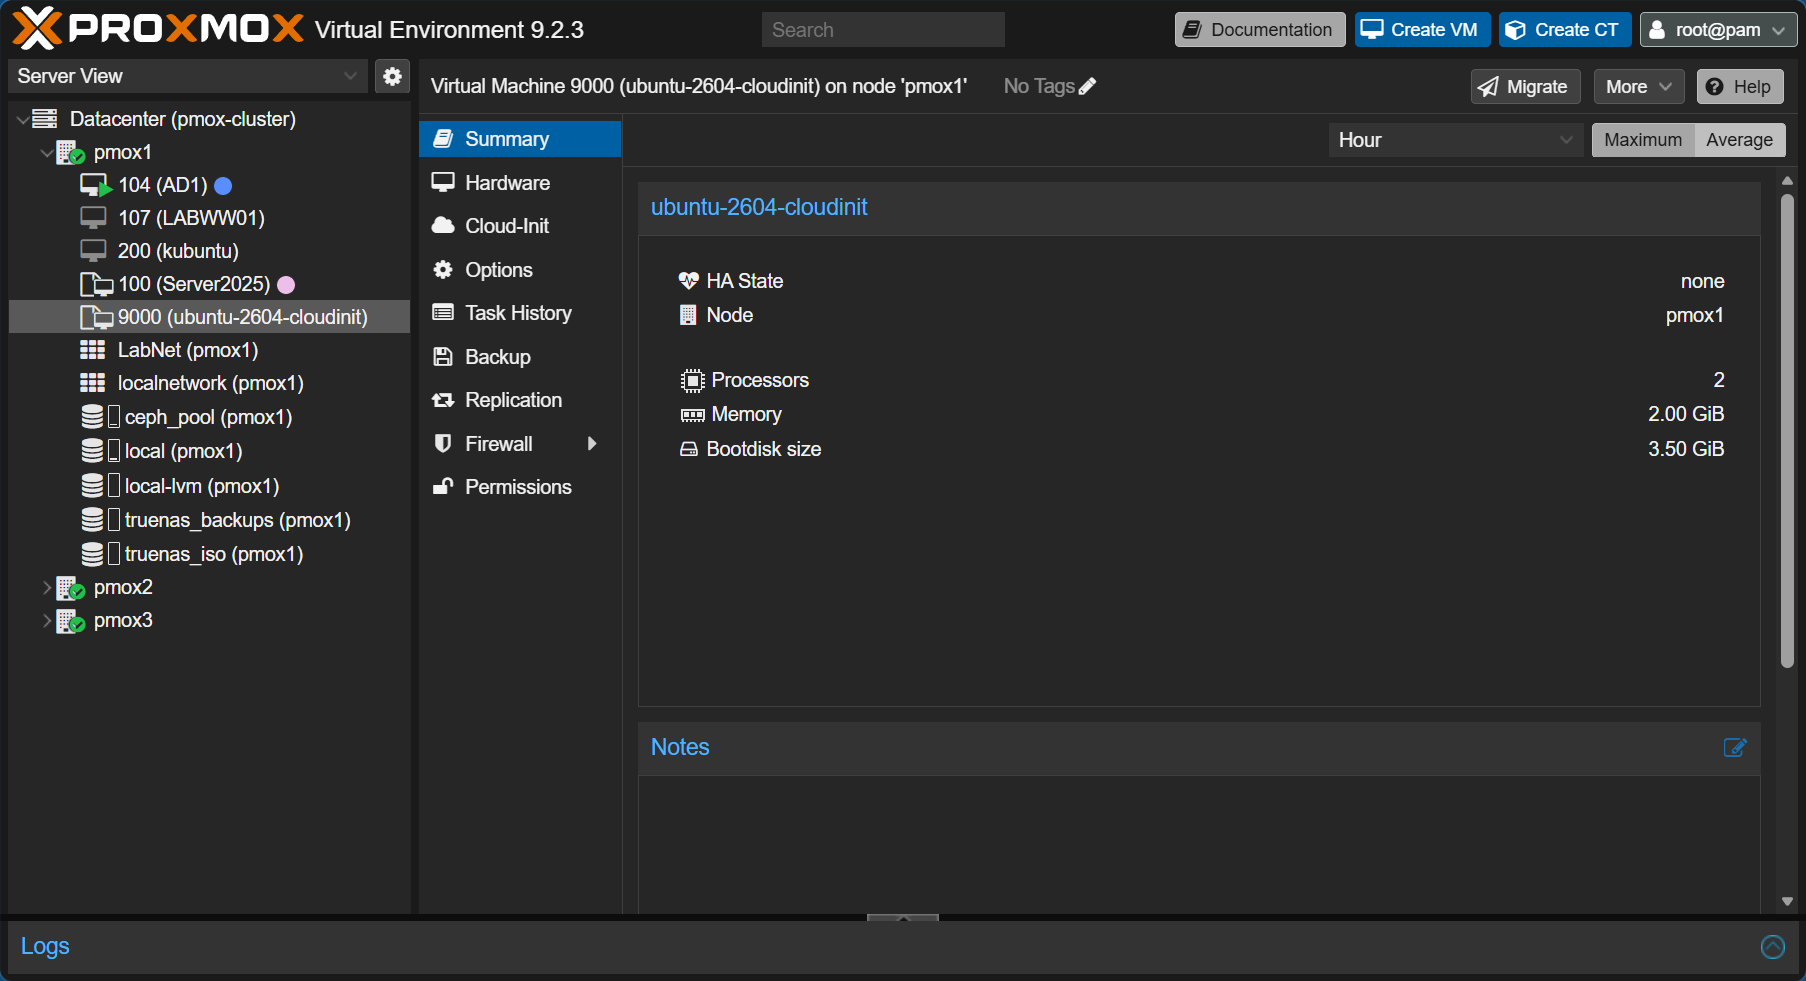
Step 7: Convert to Template
qm template 9000
Because the disk lives on Ceph, Proxmox snapshots it before locking — you’ll see Creating snap: 100% complete. That’s a shared storage bonus. VM 9000 now shows the stacked-pages template icon in the UI. Read-only from here — clone it to make VMs, never edit the template directly.
Step 8: Clone, Configure, Boot
Right-click VM 9000 then Clone. Set mode to Full Clone, assign an ID and name, target ceph_pool for storage.
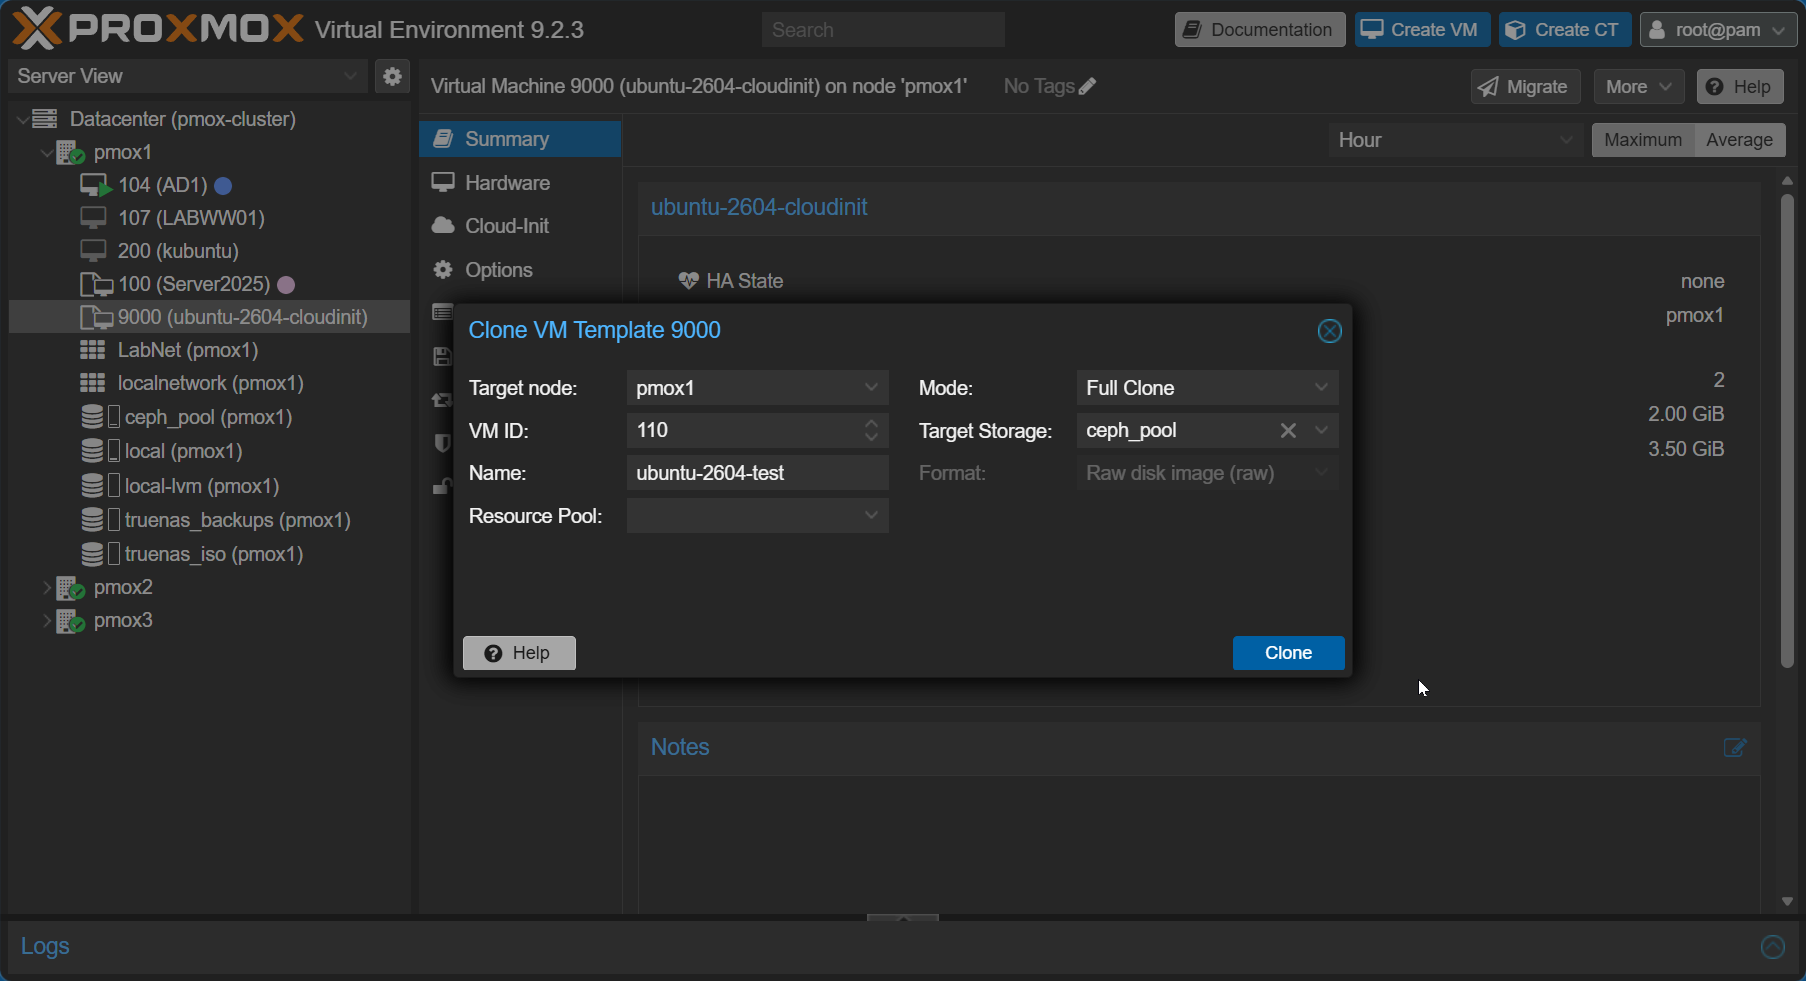
On the new VM, open the Cloud-Init tab and fill in your user, SSH public key, and IP config. Then hit Regenerate Image before starting.
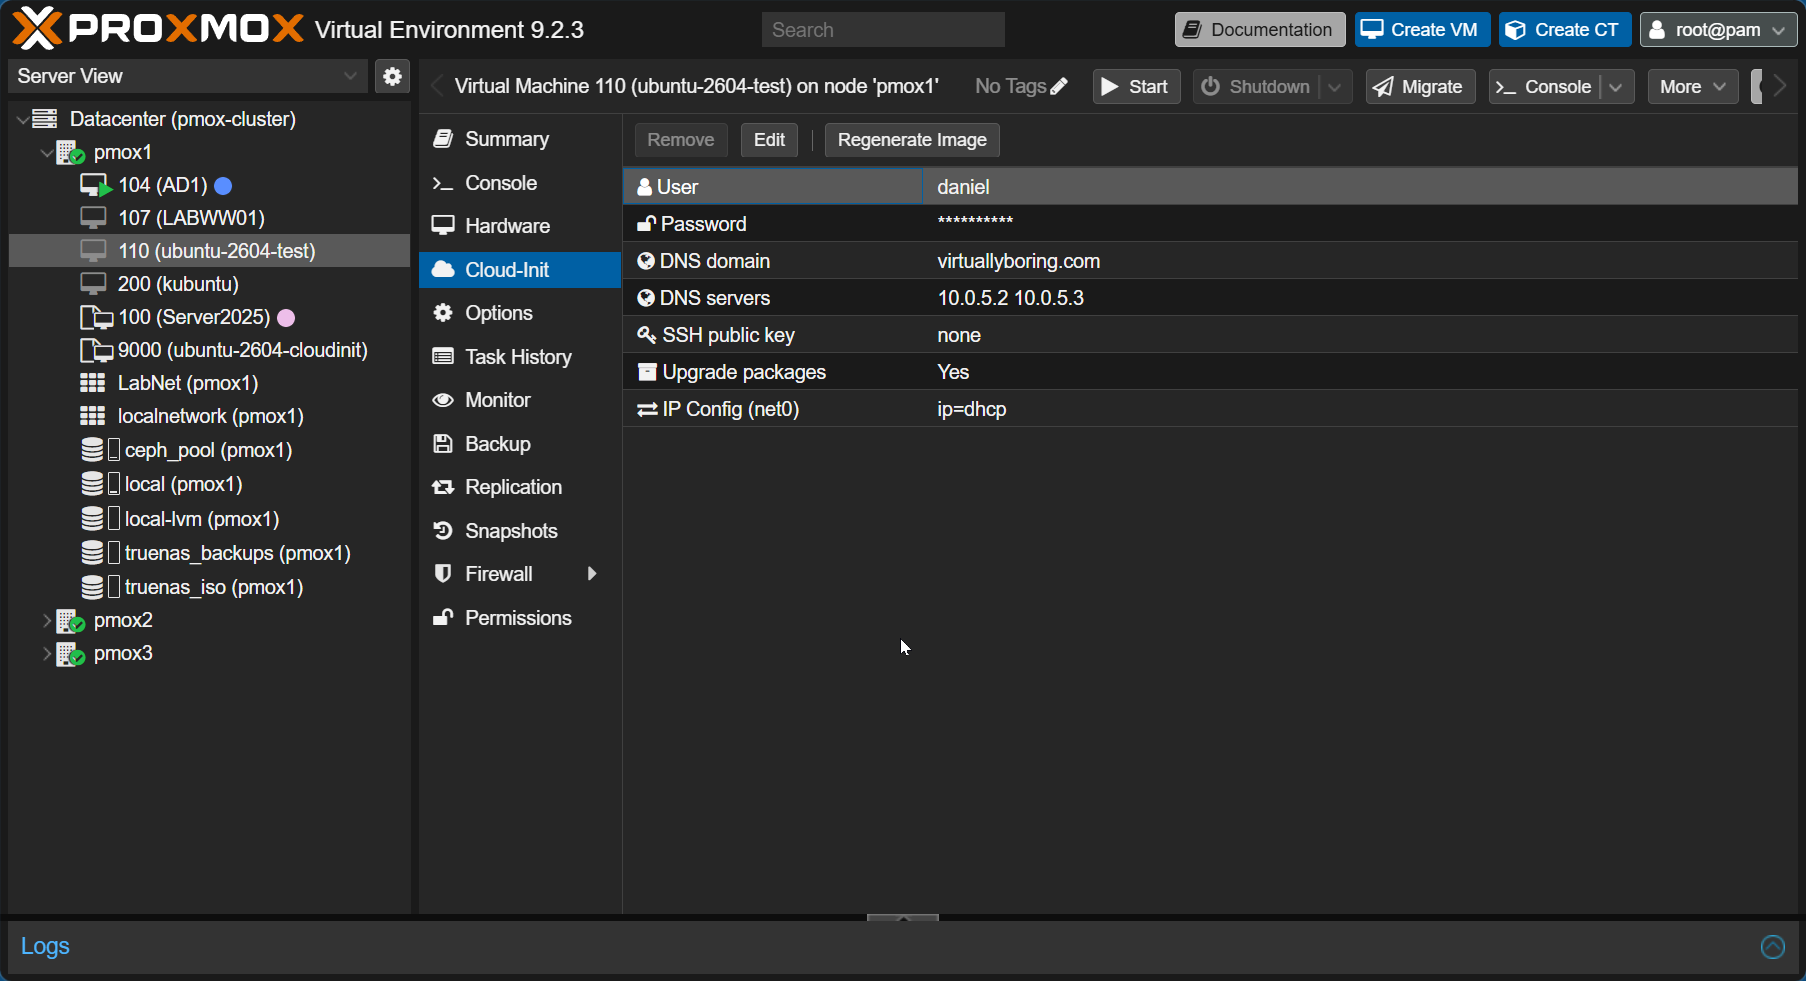
One thing I ran into: I initially tried username and password only, no SSH key. Ubuntu cloud images disable SSH password authentication by default, so even with a valid password, SSH will reject the connection. Always use an SSH key. On Windows, generate one in PowerShell:
ssh-keygen -t ed25519 -C "you@example.com"
cat C:\Users\YourName\.ssh\id_ed25519.pubCode language: CSS (css)
Paste the .pub output into the Cloud-Init SSH key field, regenerate, and you’re good.
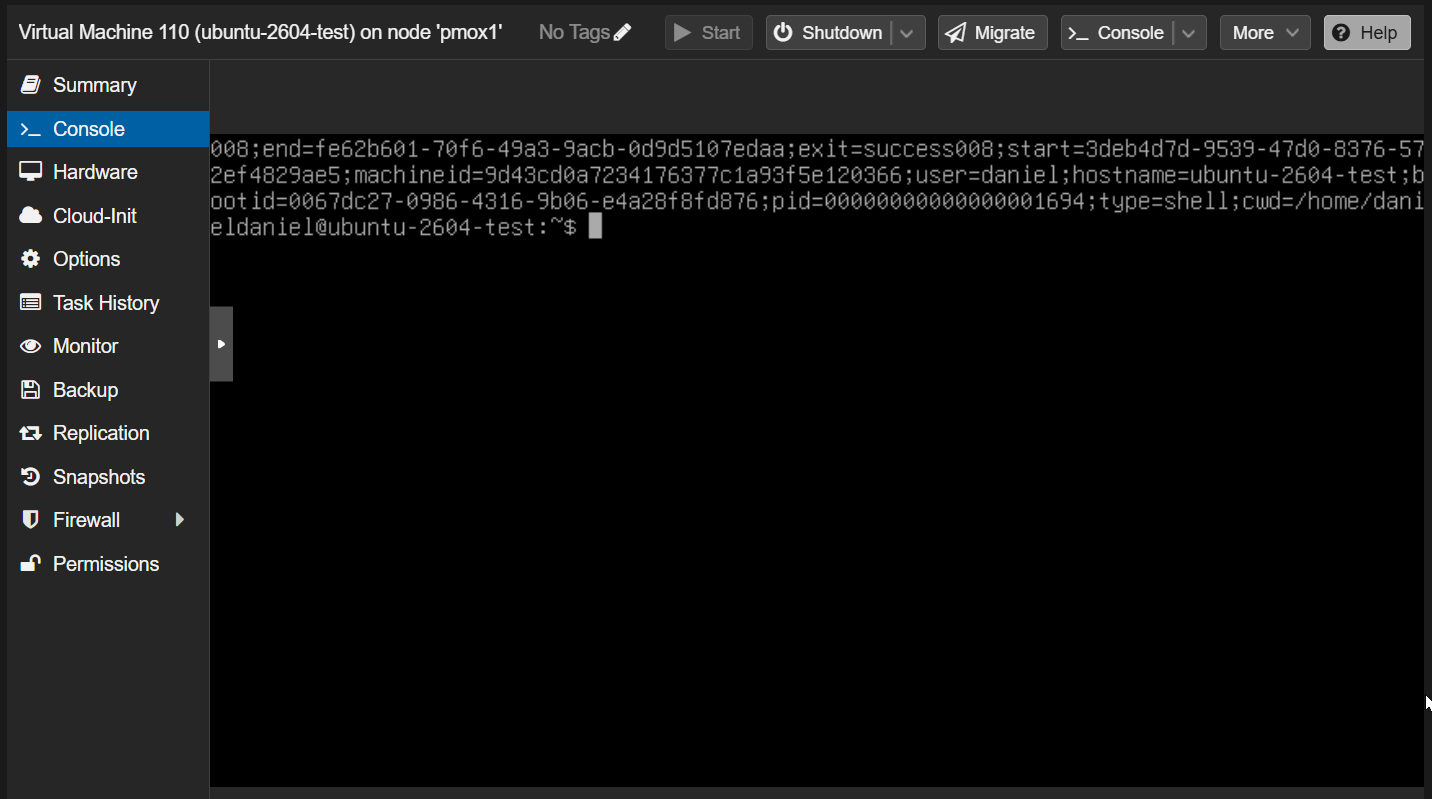
First boot takes about 30 seconds. Once the guest agent checks in, the IP appears on the Summary tab and you can SSH straight in.
Important: Everything you configured in the Cloud-Init tab — username, SSH key, IP address — was a one-time event. Cloud-Init has stamped its flag and it’s done. If you update those fields in the Proxmox UI and click Regenerate Image on a running VM, nothing will change on that VM. Those updates apply to the next clone. If you need a VM with different settings, clone fresh. That’s the workflow.
Day Two Operations
The template is built — now what? Here are the operations you’ll actually use on a regular basis.
- Resize the disk after cloning. The template disk is intentionally tiny (~3.5GB). After cloning, go to Hardware then Disk Action then Resize and add what you need (e.g. +30G). Cloud-Init automatically expands the root partition on first boot — no manual
resize2fsrequired. - Destroy and re-clone instead of patching. This is the mindset shift Cloud-Init enables. VM misbehaving or drifted from a known state? Don’t troubleshoot it — destroy it, clone a fresh one, and you’re back in 30 seconds. This is “cattle not pets” in practice.
This works cleanly when your VM is stateless — a web server, reverse proxy, monitoring agent, or any service where the app is just a binary and config that gets re-deployed from a repo or user-data script. Nothing precious lives on the disk, so nothing is lost.
If your VM has persistent data — a database, file storage, app state — you’d keep that on a separate attached disk that isn’t part of the Cloud-Init template. The VM disk stays ephemeral (OS + app binaries), and the data disk survives independently when you destroy and recreate the VM. In Proxmox, that’s just a second disk attached to the clone after it’s created.
- Use user-data snippets to keep every clone current and pre-configured. The template image is frozen at build time, so its packages will age — but you don’t need to manually refresh it. Instead, create a
user-data.yamlfile on your Proxmox host that runs on every clone’s first boot:#cloud-config
package_update: true
package_upgrade: true
package_reboot_if_required: true
packages:
- curl
- wget
- git
- vim
- htop
- net-tools
- unzip
- jq
- fail2ban
- ufw
timezone: America/Chicago
ssh_pwauth: false
runcmd:
- systemctl enable --now qemu-guest-agent
- ufw allow OpenSSH
- ufw --force enableWire it into your VM with:
qm set <VM_ID> --cicustom "user=local:snippets/user-data.yaml"Save this file at
/var/lib/vz/snippets/user-data.yamlon your Proxmox host. Every clone that uses it will update all packages, install your standard toolkit, set your timezone, lock down SSH, and enable the firewall — all before you log in for the first time.Refreshing the template itself is still an option if first-boot provisioning time matters to you. A 6-month-old template image means more packages to download on first boot. If you want faster clones, periodically: clone the template, boot it, run
apt update && apt upgrade, shut it down, delete the old template, and convert the clone. But if a slightly longer first boot is fine, user-data handles everything automatically. - Pair it with Ansible to configure apps automatically. Once your Cloud-Init VM is booted and SSH is ready, Ansible can take over and configure whatever you need — no manual steps, no drift. This is where the two tools complement each other perfectly: Cloud-Init handles the OS identity and base setup, Ansible handles the app layer.
Here’s a practical example — deploying Nginx onto a freshly cloned VM. Start with an inventory file pointing at your VM’s IP (the one that showed up in the Proxmox Summary tab after first boot):
# inventory.yml
all:
  hosts:
    web01:
      ansible_host: 10.0.5.100
      ansible_user: daniel
      ansible_ssh_private_key_file: ~/.ssh/id_ed25519
Then a playbook to install and configure the app:
# deploy-nginx.yml
---
- name: Deploy Nginx web server
  hosts: all
  become: true

  vars:
    site_name: my-lab-app

  tasks:
    - name: Install Nginx
      apt:
        name: nginx
        state: present
        update_cache: yes

    - name: Write site config
      copy:
        dest: /etc/nginx/sites-available/{{ site_name }}
        content: |
          server {
            listen 80;
            server_name _;
            root /var/www/{{ site_name }};
            index index.html;
          }
      notify: Reload Nginx

    - name: Enable site
      file:
        src: /etc/nginx/sites-available/{{ site_name }}
        dest: /etc/nginx/sites-enabled/{{ site_name }}
        state: link

    - name: Create web root
      file:
        path: /var/www/{{ site_name }}
        state: directory

    - name: Deploy index page
      copy:
        dest: /var/www/{{ site_name }}/index.html
        content: "<h1>Deployed via Ansible from Cloud-Init template</h1>"

    - name: Ensure Nginx is running
      service:
        name: nginx
        state: started
        enabled: yes

  handlers:
    - name: Reload Nginx
      service:
        name: nginx
        state: reloaded
Run it with:
ansible-playbook -i inventory.yml deploy-nginx.ymlThis works out of the box because Cloud-Init already created your user and installed your SSH key — Ansible has everything it needs to connect. Swap Nginx for any app, and the pattern is the same: Cloud-Init provisions the VM, Ansible configures what runs on it.
What’s Next
Template done — Ubuntu 26.04 LTS on Ceph, any node in the cluster can clone from it, every clone is live-migratable and HA-eligible out of the box. The first thing I’m deploying from it is Hermes Agent — and having a clean, repeatable Cloud-Init base to start from makes that setup a whole lot cleaner. I’ll cover that next.