VMware announces vSphere 6!!!

Today VMware announced vSphere 6 and will be accompanied with other releases such as vCloud Suite 6, Virtual SAN 6, and vSphere with Operations Manager. vSphere 6 has over 650 new features and innovations which makes this quite a release. There are many new amazing features to talk about so i’ll start easy with some of the key features with links for additional reading. Expect lots of vSphere 6 write ups in the near future 🙂

vSphere 6 –  New Maximums:

5.5 vs 6.0 Maximums

Few of my Favorite Features:

  • Infrastructure Controller (IC): Service that will provide the following functions:
    • Licensing
    • Certificate Store
    • Certificate Authority
    • Service Registration
    • Single Sign-On
  • Enchanted Web Client: Faster web client vs vSphere 5 (still isn’t HTML5)
  • vMotion Improvements:
    • Long Distance vMotion: Increased network latency tolerance from 10 ms to 100 ms
    • vMotion across vCenters: vMotion across data center and vCenter boundaries that vSphere 5 had.
    • vMotion across virtual switches: Basically enables the above, can vMotion across Virtual Standard Switch (vSS) and  Virtual Distributed Switches (vDSs).
  • Fault Tollerance: Now supports 4 vCPUs, up from 1 vCPU.
  • vVols (Virtual Volumes): New storage feature that allows virtual machines to interact with the storage directly without the need of VMFS LUNs.
  • Content Library: Centralized management for VM templates, virtual appliances, ISO images, and scripts. (Wooooot!!!!)
  • vCenter Appliance: Now has the same scalability numbers as the Windows installed vCenter: 1,000 hosts and 10,000 virtual machines. Also supports linked mode!! (Post coming soon on how to convert)

Additional Reading:

What’s New in VMware vSphere 6.0?

What’s New in the VMware vSphere 6 Platform\

vSphere 6 Datasheet

What’s New in VMware Virtual SAN 6.0?

What’s New in VMware vSphere with Operations Management 6.0?

StarWind Virtual SAN: A Storage Solution for your virtual environment

One important thing you need for your virtual environment is storage. If you have a single ESXi host then using local storage is just fine but if you have multiple hosts and want to use features such as vMotion, High Availability (HA) , and DRS you need shared storage. In my quest to find a storage solution I started out using my Synology DS411slim. It works fantastically but I am very limited with speed and drive size due to the 2.5″ drive limitation. With the cost very high for a new Synology unit it left me seeking an alternative solution, that is where StarWind Virtual SAN steps in. StarWind Virtual SAN presents a servers local storage as a iSCSI LUN and even performs VMware VAAI functions.

StarWind Disk

There is a free edition StarWind offers that is perfect for home labs, test and dev environments. You can download and receive your license key here: http://www.starwindsoftware.com/starwind-virtual-san-free

Prerequisites:

At a minimum all you need is some local storage and a network connection as you will be presenting it out as iSCSI. Luckily I have a Dell PowerEdge R520 that will become my virtual SAN server. For better performance, you should have storage running on a RAID (5,10, etc) and multiple network connection that will be dedicated for iSCSI traffic. I have eight 300GB 10k SAS drives using RAID 5, I carved 300GB for my boot drive which left 1.6 TB for my D:\ drive.

LABCORE01 Disks

Installation:

Installation and setup of Starwind Virtual SAN is super easy. You can have it installed and presenting storage in roughly 5 minutes! The install process is pretty much straight forward but is documented below:

1 Install Welcome

Agree and click Next:

2 License Agreement

Read through the information, click Next:

3 Information

Pick your installation directory, click Next:

4 Destination

Recommend doing a full install (only 108.4 MB), click Next:

5 Select Install

Pick if you want a desktop icon, click Next:

7 Desktop Icon

Review and click Install:

8 Ready to Install

Storage Management Initiative – Specification (SMI-S) is a management standard for SANs. You can read more about it here. Go ahead and click Yes:

9 Configure SMI-S Agent

Only thing you should do is set a password. Type a password of your choosing, click Ok:

10 SMI-S Agent Config

Leave the check in the box to launch the Management Console, click Finish:

11 Install Complete

Installation is complete!

Configuration and Setup:

StarWind Management Console

It is asking you what drive and location you want to store the virtual SAN hard drive files. In my case it’s the D:\ drive. Change yours if applicable:

12 Storage Location

Welcome to the StarWind Management Console. We only have two more things to do before we have a operational virtual SAN.

1 StarWind Management Console

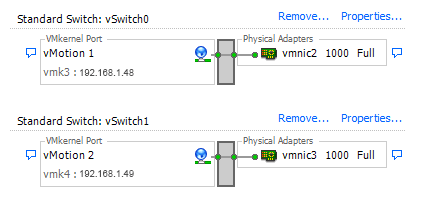
If you have multiple network connections you can dedicate some of them only for iSCSI traffic.

In my case I have four connection and will dedicate two NICs (well, once I plug in my second cable) :). Each of my two ESXi hosts will have their own dedicated NIC for storage traffic:

2 Network Connecctions

Back on the Management Console, click on the Configuration tab, then Network. If you are dedicating iSCSI traffic go ahead and remove the IP address of the server. Then only your iSCSI NICs will be listed. If you aren’t going this approach then ignore this step.

3 Network Configuration

Now, let’s create the disk that will be the storage of your virtual SAN. Click on Add Device, you can change the name if you want or leave the default Storage1, type in how much space to make the disk and click Next:

4 Add Device

Now click Create:

5 Create Virtual Disk

Finished! Click Close:

6 Creation Complete

We now have virtual SAN storage!!

7 Virtual SAN Completed

Configuring ESXi Host for iSCSI:

Now we can configure the host to find our virtual disk. Go to your host, Configuration tab, then Storage Adapters. If you have a iSCSI card you can use it or you can add a software iSCSI Adapter. Right click your iSCSI adapter and click Properties:

1 Host Storage Adapters

Click on Dynamic Discovery then click Add:

2 iSCSI Initiator

Enter the IP address of your StarWind Virtual SAN server then click Ok:

3 Add iSCSI Targer Server

You will see the entry, now click Close:

4 iSCSI Initiator Finish

Click on Yes for it to perform a scan:

5 Rescan iSCSI Adapter

You should now see the Starwind disk appear!!

6 Starwind iSCSI Dis

VMware – Don’t Miss Event – February 2nd

VMware announced an online event “that should not be missed” scheduled on February 2nd. There are many rumors floating around the net but I personally feel vSphere 6.0 will be announced.  Excited to see what is announced!! Register Here!

This event is so BIG that we’re offering broadcasts around the globe the entire week of February 2…and continuing the excitement throughout February. All event registrants will automatically receive access to additional content, engagement, and activities via our online event platform.

Event Times:

AMERICAS

Date: February 2, 2015
Time: 1:00 – 2:00 PM PST / 4:00 – 5:00 PM EST

EMEA
Date: February 3, 2015
Time: 9:00 – 10:00 AM GMT / 10:00 – 11:00 AM CET

ASIA PACIFIC – ASEAN, Western Australia, Hong Kong
Date: February 5, 2015
Time: 10:00 – 11:00 AM SGT

ASIA PACIFIC – Sydney, Australia
Date: February 5, 2015
Time: 10:00 – 11:00 AM AEDT

ASIA PACIFIC – Mumbai, India
Date: February 5, 2015
Time: 10:30 – 11:30 AM IST

Guest customization runs on every boot

In our vSphere 5.1 update 2 environment we found that some of our Windows virtual machines were running guest customization every time they boot. This was causing them to loose their static IP address and take an additional 5 minutes to boot.

vmware-image-customization

To fix this issue, boot to Windows and open regedit. Navigate to to the following location:

HKLM\System\CurrentControlSet\Control\Session Manager\

Regedit Key

Edit the BootExecute key and remove all sysprepDecrypter.exe lines. We had some VMs with up to 10 entries!

Regedit - edit key

Your key should now look like this:

Regedit - correct key

Click OK. Now the VM will not perform the guest customization on every boot.

To prevent future VMs you deploy from gaining this issue update your vSphere environment to at least 5.1 Update 5.

Authorize Exception Error when logging into vCenter

If you get the following error when logging into vCenter(5.1U5): “A general system error occurred: Authorize Exception”

vCenter - Authorize Exception error


Restarting the Single Sign On service on your vCenter should resolve the issue. In my case the cause of this was due to the LDAP connection pool being exhausted. To confirm this check the ssoAdminServer.log found here:

C:\Program Files\VMware\Infrastructure\SSOServer\log

Do a search for the following error: No ManagedConnections available within configured blocking timeout

If you find that around the time when you was logging in then your LDAP connection pool was exhausted. This issue is resolved in vSphere 5.5.

The VMware KB article for this issue 2055448:

http://kb.vmware.com/selfservice/microsites/search.do?language=en_US&cmd=displayKC&externalId=2055448


The VMRC console has disconnected…attempting to reconnect

This morning I received an error I haven’t seen before when trying to open the console of a VM in our ESXi 5.5 environment….  “The VMRC console has disconnected…attempting to reconnect.

VMRC Console Disconnected Error

There are two ways to fix this. The easy way is to reboot your computer 🙂 If you would want to avoid a reboot you can do the following:

Close out all of your VMware vSphere Clients and open Task Manager. You will want to make sure all processes named “vmware-vmrc.exe“, “vmware-remotemks.exe“, and “vpxclient.exe” are not running. If they are go ahead and end all those processes.

Task-Manager-vmware-vmrc Task-Manager-vpxclient

Now open up the vSphere Client, console should now work:

Yay its fixed


Comment below and let me know what worked for you!


Multi-NIC vMotion

In vSphere 5 a new feature was added that many people may be overlooking. It is called Multi-NIC vMotion. If you have a environment where you have 2 or more dedicated uplinks reserved for vMotion you can double the total bandwidth available by using this option. Do I have your attention? 🙂

Normally you would have 1 port group with both of your vMotion uplinks set to active like this:

A Normal vMotion Port Group

What if I told you when you are vMotioning a VM, the VMkernal is picking one of those uplinks and basicly ignoring the other? According to the VMware KB article 2010877, “The VMkernel TCP/IP stack uses a single routing table to route traffic. If you have multiple VMkernel network interfaces (vmknics) that belong to the same IP subnet, the VMkernel TCP/IP stack picks one of the interfaces for all outgoing traffic on that subnet as dictated by the routing table.” If you want to use both uplinks for vMotion traffic and double your total bandwidth you have to create two vMotion VMkernals and assign each one a uplink. There was some issues with multi-NIC vMotions if you were running ESXi version before 5.0U2. As always try this out in your test enviroments first 🙂

Here is VMware KB2007467 walking you through these steps that compliment my steps below.

First we will create a new port group and rename the current vMotion port group to show them apart. In my case I will name one “vMotion-uplink3” and the other “vMotion-uplink4”.

New vMotion PortGroups

Now right click a port group, go to Edit Settings, then click on Teaming and Failover. You will take one of the uplinks and move it to standby so you do not loose redundancy. Do the same thing for the second vMotion port group but flip the uplinks. See screen shots below:

vMotion-uplink3
vMotion-uplink3
vMotion-uplink4
vMotion-uplink4

Now the port groups are set for the next step.

Go to Hosts and Clusters, click on a host, click on Configuration tab -> Networking -> vDS -> and Manage Virtual Adapters.

I have only 1 vMotion VMkernal configured using vMotion-uplink3. I want to add another VMkernal set for vMotion that will use vMotion-uplink4. Click Add:

Manage Virtual Adapters

Chose New virtual adapter and click Next:

Add Virtual Adapter

Click Next:

Virtual Adapter Type

Select the new vMotion port group and check the vMotion checkbox. Click Next:

Connection Settings

Give this new vMotion kernal a new, unused IP address, click Next:

Virtual Adapter IP

Now click Finish:

Virtual Adapter Finish

That is it. You have have multi-NIC vMotion configured. You will have to do this for each host that you want to enable this on. Put a host in maintenance mode and see if you get a increase in speed. You can also turn on jumbo frames if your switch supports it for a further speed increase! In our test environment that has two 1 GB vMotion uplinks, it reduced the time it took for a host to enter maintence mode from 40 minutes down to low/mid 20’s. Please leave a comment and let me know your results!!

Installing VMware ESXi and vCenter 5.5 [Part 1]

Installing VMware vSphere 5.5 Series:

In this series I will be installing ESXi and vCenter using Microsoft Server 2012 R2 virtual machines.

Part 1: Introduction and ESXi Installation
Part 2: Microsoft SQL 2012 Installation
Part 3Creating the vCenter Database & ODBC Setup
Part 4: vCenter 5.5 Installation
Part 5: Initial Setup (Accessing vCenter, Configure Basic Permissions, Add Host)ESXi Hypervisor
Downloading ESXi: If you will be running ESXi from a physical server you will want to use the ESXi image provider by the hardware manufacture such as Dell, HP, Cisco. Their ESXi image has the drivers and software specific for the hardware. If you will be running ESXi in a nested environment, then the ESXi image from VMware is what you want. Here are the download links for each manufacturer:
HP: http://h18004.www1.hp.com/products/servers/software/vmware/esxi-image.html
Dell: http://www.dell.com/support/home/us/en/19/Drivers/DriversDetails?driverid=5YC4T
Cisco: http://www.cisco.com/c/en/us/td/docs/unified_computing/ucs/release/notes/OL_26617.html
VMware: http://www.vmware.com/go/download-vspherehypervisor

ESXi Installation: First boot your server from the ESXi ISO. Depending on your hardware you should mount the ISO using iLo/iDRAC/etc. Another nice way is to boot it from a USB thumb drive. You can make your USB bootable by using this tool: http://rufus.akeo.ie/ . Of course you can do it the old fashion way and burn the ISO to a disc. The first screen that pops up should look like this. It has a timer that will count down and automatically take you into the installer unless you hit a button on your keyboard.

Installing VMware ESXi and vCenter 5.5

ESXi Installer Load Screen:

2 ESXi Installer Load Screen

Welcome to the ESXi 5.5 Installation. Hit Enter:

3 ESXi Welcome

Accept the license agreement and hit F11:

4 ESXi License Agreement

Here you select where you want to install ESXi. You will have already configured your hard drives with a RAID if applicable (if not go do that and start over). The installation of ESXi is very small, you could use a thumb drive and install to it. Once you select your install location hit Enter:

5 ESXi Disk Selection

Pick your keyboard layout and hit Enter:

6 Keyboard Layout

Enter a password for the root account. Hit Enter:

7 Set Root Password

ESXi is ready to begin the installation. Hit F11:

8 Confirm Install

ESXi Install Progress Screen:

9 Install Progress Screen

Installation is complete. Hit Enter to reboot:

10 ESXi Installation Complete

11 Rebooting Server

Here is what the ESXi screen looks like after booting. Lets do some basic configuration such as setting a static IP, naming this host and ensuring the correct uplinks are selected. Hit F2 to bring up the login menu:

12 First Boot

Enter the password that was set during the install, hit Enter:

13 ESXi Login

Scroll down to Configure Management Network, hit Enter:

14 Configure Management Network

Go to Network Adapters and hit Enter:

Network Adapters Selection

This is where you can select what uplinks the management network has. This screen might be different depending on your environment. Hit space bar on the vmnics that you want to use, when finished hit Enter:

15 Network Adapter

Now scroll down to IP Configuration, hit Enter:

17 IP Configuration

In my lab I want to set a static IP address, once finished hit Enter:

18 Default Gateway

If you are not using IPv6, go to IPv6 Configuration and disable it:

19 IPv6

Now go to DNS Configuration and hit Enter:

20 DNS Configuration

Set your DNS information and host name, hit Enter:

21 DNS Configuration Entry

Now hit ESC to exit, you will be prompted to reboot thehost for the changed to take affect. Hit Y to reboot:

22 Reboot Host

Now your ESXi host is ready for use:

23 Ready for Use

Continue to Part 2: https://boring.wpengine.com/installing-vmware-esxi-and-vcenter-5-5-part-2/

Installing VMware ESXi and vCenter 5.5 [Part 2]

Installing VMware vSphere 5.5 Series:
Part 1: Introduction and ESXi Installation
Part 2: Microsoft SQL 2012 Installation
Part 3Creating the vCenter Database & ODBC Setup
Part 4: vCenter 5.5 Installation
Part 5: Initial Setup (Accessing vCenter, Configure Basic Permissions, Add Host)

I am installing Microsoft SQL 2012 on a Microsoft Server 2012 R2 virtual machine. In this walk through I am installing SQL and vCenter on separate virtual machines.

Microsoft SQL 2012 Installation:

1. Go to the Installation tab and click on the New SQL Server stand-alone installation:

SQL Install

2. Setup Support Rules – It will run a quick preinstall scan. Click Next:

Setup Support Rules

3. Product Key – You can proceed with an 180 day Evaluation, Express or enter your product key, click Next with your selection:
Product Key

4. License Terms – Check the box to accept the license terms, check the box if you want to send usage data to Microsoft (who wouldn’t? 🙂 ) now click Next:
4 License Terms

5. Product Updates – Go ahead and install the updates, click Next:
5 Product Updates

6. Setup Support Rules – It will run another test, click Next:
6 Setup Support Rules

7. Setup Role – Ensure SQL Server Feature Installation is selected, click Next:

7 Setup Role

8. Feature Selection – Check the following options:
     a. Database Engine Services
     b. Client Tools Connectivity
     c. Integration Services
     d. Management Tools – Basic
     e. Management Tools – Complete

Also on this screen you can change the install directory to a different drive. In this case I am installing it in my lab so I am leaving it to default. Click Next:
8 Feature Selection

9. Installation Rules – It will run another check, if everything looks good click Next:
9 Installation Rules

10. Instance Configuration – Here you can change the instance ID and instance root directory. Again in this instance I am leaving default. Click Next:
10 Instance Configuration

11. Disk Space Requirements – This is checking to ensure you have enough disk space. Click Next:
11 Disk Space Requirements

12. Server Configuration – Change the Account Name to the service account you created. Also change the Startup Type to Automatic. Click Next:
12 Server Configuration

13. Database Engine Configuration – Here you can set the authentication mode. Lock it down to suit your environment. Since this is my lab I am going to use Mixed Mode and add the service account and domain admins to make administration simplistic. Click Next:
13 Database Engine Configuration

14. Error Reporting – If you want to send error report to Microsoft check the box. Click Next:
14 Error Reporting

15. Installation Configuration Rules – It will run another test to ensure everything will go smoothly, click Next:
15 Installation Configuration Rules

16. Ready to Install – Here is a summary of the install, click Install to let the installation commence!
16 Ready to Install

17. Installation Progress – Grab some coffee, this will take around about 20 minutes on average:
17 Installation Progress

18. Complete – SQL 2012 is now installed! Now we are ready to setup the vCenter database in Part 3.
18 Complete

Continue to Part 3:
https://boring.wpengine.com/installing-vmware-esxi-and-vcenter-5-5-part-3/

Installing VMware ESXi and vCenter 5.5 [Part 3]

Installing VMware vSphere 5.5 Series:
Part 1: Introduction and ESXi Installation
Part 2: Microsoft SQL 2012 Installation
Part 3Creating the vCenter Database & ODBC Setup
Part 4: vCenter 5.5 Installation
Part 5: Initial Setup (Accessing vCenter, Configure Basic Permissions, Add Host)

Now that we have SQL installed its time to setup the vCenter database and ODBC connections.

Creating the vCenter Database

If you are experienced in SQL you can set the database up manually or use the provided schema SQL script from VMware vCenter installation media. In this install i’ll be using the VMware provided DB schema. This can be obtained in the \\vCenter Installation Media\vCenter-Server\dbschema\DB_and_schema_creation_scripts_MSSQL.txt  To make it easier below is a copy/paste of the script. You will have to change the database name, username, password and database location to match your setup.

use [master]
go
CREATE DATABASE [VCDB] ON PRIMARY
(NAME = N'vcdb', FILENAME = N'C:\VCDB.mdf' , SIZE = 3000KB , FILEGROWTH = 10% )
LOG ON
(NAME = N'vcdb_log', FILENAME = N'C:\VCDB.ldf' , SIZE = 1000KB , FILEGROWTH = 10%)
COLLATE SQL_Latin1_General_CP1_CI_AS
go
use VCDB
go
sp_addlogin @loginame=[vpxuser], @passwd=N'vpxuser', @defdb='VCDB', @deflanguage='us_english'
go
ALTER LOGIN [vpxuser] WITH CHECK_POLICY = OFF
go
CREATE USER [vpxuser] for LOGIN [vpxuser]
go
CREATE SCHEMA [VMW]
go
ALTER USER [vpxuser] WITH DEFAULT_SCHEMA =[VMW]
go

Open SQL Server Management Studio and login using an account that has access:

1 SQL Connect to Server

Now click on “New Query” and enter the database script from above. You will need to change the following:

  • Add the location of your SQL data directory. I used defaulted install so below is my path./
  • Change the initial size of the MDF to 4096KB, if you leave it at the default 3000KB you will get an error when you execute.
  • This script will create a user and give it  DBO permissions, rename the vpxuser with your own username. Make sure it matches all the way through the script.

Click Execute. You should receive a message saying “Command(s) completed successfully. You will now have a VCDB DB under Databases.

2 SQL Execute

Next right click on your VCDB database and go to Properties:

3 DB Properties

Go to the Options page and change the Recovery model to Simple. Click Ok:

4 Recovery Mode

Before we leave SQL Management Studio as a best practice right click your SQL server name and go to Properties:

5 SQL Properties

On the Memory page we will want to limit the amount of memory SQL can use. I am running this in my home lab on a VM with 4 GB of RAM. I will give SQL 2 GB which leaves 2 GB for the OS. Click Ok:

6 SQL Memory Settings

Skip this part if vCenter and SQL are running on the same box: You will need to modify the TCP/IP settings for SQL. Open the SQL Server Configuration Manager, go to SQL Server Network Configuration, then Protocols for MSSQLSERVER. Right click on TCP/IP and click Properties. Make sure to change Enabled to Yes and TCP Dynamic Ports to 0 (zero). Click OK:

7 SQL TCPIP Properties

It is a good time to reboot your SQL server for the settings to take effect.

ODBC Setup:

Next parts are to be done on your vCenter server. Now we get to setup the ODBC connection for vCenter to use.

Go to Start -> Administrative Tools -> and open ODBC Data Sources (64 Bit):

8 ODBC 64bit

Click on the System DSN tab and click Add:

9 ODBC Administrator

Click on SQL Server Native Client 11.0 and click Finish. Note: You will not have this option if SQL was installed on a separate server. To install it proceed to the next step:

10 ODBC SQL Server Native Client

Skip this if you had the SQL Server Native Client as an option: The easiest way to install this is by downloading it from the Microsoft website. Under “Install Instructions” find the section that is shown in the screenshot below. Download and install the x64 version. It’s a straight forward install. Now perform the step above.

http://www.microsoft.com/en-us/download/details.aspx?id=29065&fa43d42b-25b5-4a42-fe9b-1634f450f5ee=True

11 ODBC SQL Native Client MS Download

Direct Link to X64 Package: http://go.microsoft.com/fwlink/?LinkID=239648&clcid=0x409


Now you will want to name this connection, give it a description and enter your SQL server name. If you are going to run vCenter and SQL on the same server use localhost. Otherwise use the FQDN. Click Next:

12 ODBC SQL Server Data Entry

Enter the username and password you created during the database setup, click Next:

13 ODBC SQL Creds

Change the default database to your created vCenter DB. Click Next:

14 ODBC Default DB

Change your language to your preference. Now click Finish:

15 ODBC SQL Language

Click on Test Data Source. You should get test completed successfully. Click Ok:

16 ODBC Test Data Source 17 ODBC Data Source Test Results

You now have your ODBC connection setup for vCenter:

18 ODBC Completed

Now it is time to install vCenter!

Continue to Part 4:
https://boring.wpengine.com/installing-vmware-esxi-and-vcenter-5-5-part-4/